Learning the Scratch user interface
This focuses on the Scratch 2.0 editor, though it’s similar in layout to the interface of earlier editions of Scratch.
The main editor
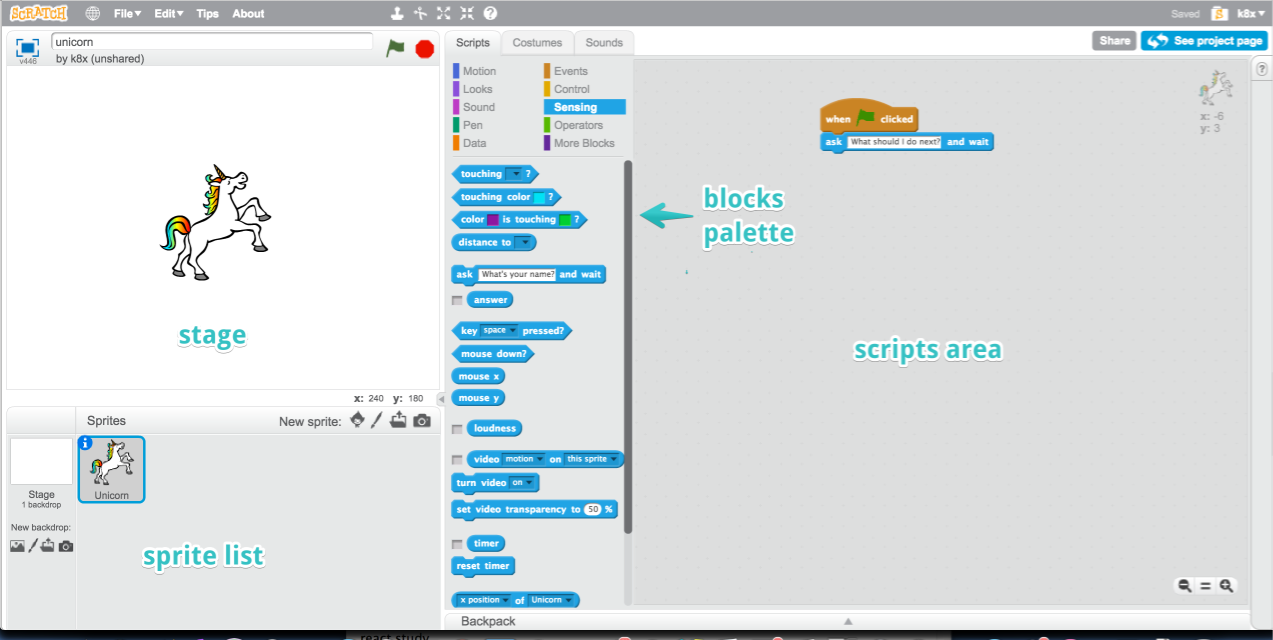
Available at: https://scratch.mit.edu/projects/editor/
Getting to know the scratch interface
To create with Scratch, it helps to be familiar with the different parts of the Scratch editor interface.
The main areas to be familiar with in the Scratch editor is the stage, the scripts area, block palette, the sprites pane and main menus.
The scripts area
This is where you can drag and manipulate blocks of code to make your Scratch project.
To remove something from your Scripts area, just drag it back onto the blocks palette.
Sprites Pane
The sprites pane includes thumbnails of the sprites your current project uses. To edit the script of a particular sprite, it needs to be selected in the Sprites pane.
Block Palette
The block palette is made up of different ‘blocks’ of code that you can drag and drop onto the scripts area.
The code blocks are colour coding by block groups so you can easily find a block based on its colour. The block categories are Motion, Looks, Sound, Pen, Data, Events, Control, Sensing, Operators, and More Blocks.
What is a sprite?
A sprite is an object that performs actions in Scratch. Sprites are the only part of your project that can move.
What is a stage?
Stages, on the other hand, are the backdrops in your project.You can make changes to these backdrop images but they don’t move and can’t perform actions based on the scripts you create.
![]()
Subscribe
Subscribe to this blog via RSS.
Categories
Question 1
Ingredients 21
Recipes 26
Recent Posts
-
 Posted on 24 Jul 2017
-
 Posted on 20 Jun 2017
-
 Posted on 15 Jun 2017
-
Getting started with JavaScript Blocks Editor (PXT) on Micro:Bit
Posted on 10 May 2017
Popular Tags
Arduino (2) Microcontrollers (2) Makeymakey (6) Scratch (8) Coding (6) Software (3) Sketches (1) Ide (1) Raspberrypi (11) Linux (2) 3dprinting (1) Manufacturing (1) Vr (1) Virtual_reality (1) Google (1) Circuits (3) Littlebits (4) Kits (2) Keyboard (2) Inputs (1) Cli (1) Command-line (1) Magazine (1) Make (2) Events (4) Makerfaire (1) Wires (2) Equipment (2) Breadboard (1) Electronics (3) Audio (1) Soundplant (2) Planning (2) Funding (1) Ozobot (1) Creative-computing (1) Music (3) Sonicpi (3) Cloudbit (2) Thimble (1) Images (1) Html (2) Webmakers (2) Internet (1) Ifttt (1) Sensors (2) Css (1) Learntocode (4) Paint (1) Conductivity (2) Picoboard (2) Activities (1) Workshops (3) Families (1) Microbit (4) Javascript (2) Paper (1) Electricity (1) Display (1) Browser (1) Remote (1) Headless (1) Signage (2) Digital signage (2) Privacy (1) Security (1) Configuration (1) Tools (1) Troubleshooting (1) Bugs (1) Problem-based learning (1) Hex (1) Programs (1) Onboarding (1)