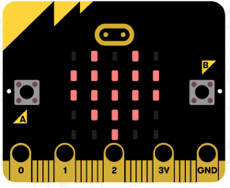
Micro:bit starter hex file
What is it
When you first use your Micro:bit development board, the device will guide you through a few starter activities and help users get started.
New Makers guide to troubleshooting & debugging
What is it
This guide was developed to help new makers solve issues and fix bugs that they encounter in their maker adventures.
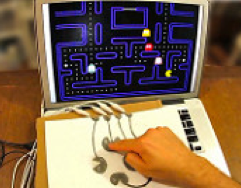
Make your own game controller with Makey Makey
Intro
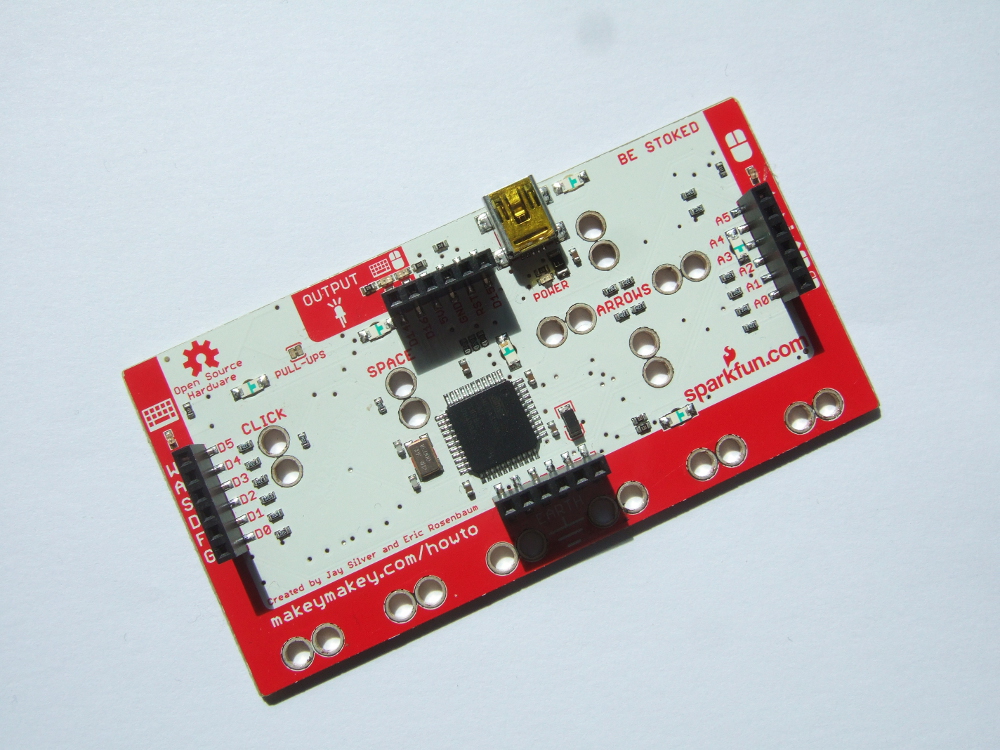
Makey Makey is a simple circuit board you can use to create your own keyboard for a computer. This means you can use conductive materials to create your own game controller.
Getting started with JavaScript Blocks Editor (PXT) on Micro:Bit
Intro
JavaScript Blocks Editor (PXT) is a drag and drop editor for JavaScript available on the Micro:Bit.
JavaScript Blocks Editor (PXT) is an updated version of the Javascript Blocks environment on the Micro:bit and includes some additional features like peer-to-peer radio.
In this tutorial, we’re going to run and initial hello World script on our Micro:bit and also test out the hidden easter egg.
Configuring a Raspberry Pi with PiBakery
Intro
PiBakery is a tool that provides a visual, drag and drop interface for configuring the Raspbian operating system for your Raspberry Pi.
It’s developed by David Ferguson and is available for Mac or Windows (or source).
Raspberry Pi Digital Signage with Pi Presents
Intro
You can use a Raspberry Pi attached to a monitor or TV as a affordable digital signage solution to display websites, images or videos. In this example, we use Pi Presents to create a multimedia digital signage solution.
Privacy Checklist Bookmark template
What is it
This bookmark was created as a handy takeaway checklist for users about some online privacy best practices.
Raspberry Pi Digital Signage with Screenly
Intro
You can use a Raspberry Pi attached to a monitor or TV as a affordable digital signage solution to display websites, images or videos. In this example, we use Screenly OS to create a simple digital signage solution.
Accessing your Raspberry Pi remotely using tightvncserver
Intro
If you don’t have access to a monitor and keyboard or just because it can be more convenient, you may want to access your Raspberry Pi from your laptop or desktop computer.
There are a few different ways to do this but in this tutorial we’re going to log in and access our Raspberry Pi remotely using Virtual Network Computing (VNC). VNC is a way of sharing desktops so you can remotely control another computer.
TightVNC is a cross-platform ,open-source remote desktop software application.
Creating a Full screen display with Raspberry Pi
Intro
The Raspberry Pi can be a great way to have a low-cost, low-powered display to create a display that can then be updated remotely.
If you are using your Raspberry Pi with a monitor to display a website, dashboard or calendar or something you don’t want it to appear n a browser with the full desktop visible. It also helps to have it autoboot.
In this tutorial, we’ll set up a calendar display that automatically launches in fullscreen mode. This fullscreen mode is often called kiosk mode.
Making a paper circuit
Intro
Paper circuits are a cheap, creative and accessible way to learn the basics of electronics and circuits.
Using a conductive material like copper tape (or conductive ink), you can create simple circuits on paper that are powered by a coin cell battery.
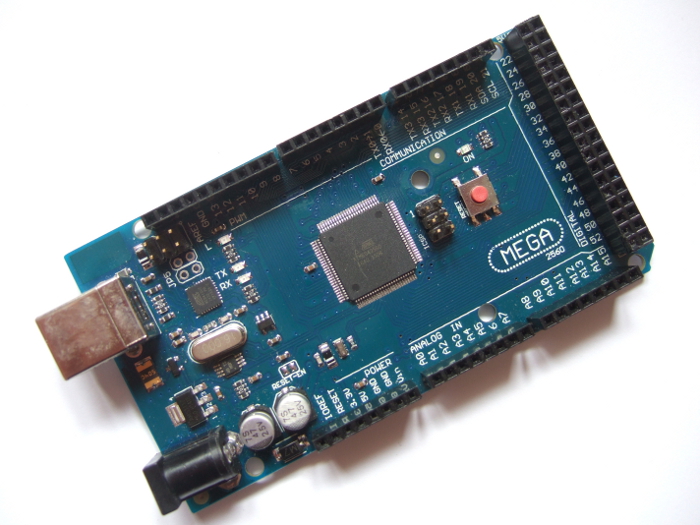
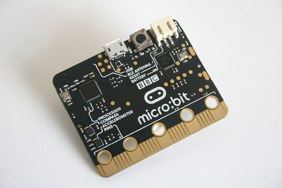
BBC Micro:bit
What is it?
The BBC Micro:bit is a tiny, codeable computer developed by BBC and a plethora of other partner organisations (29 partners!) and made available for free to every child in year 7 (or equivalent) across the UK.
The device supports motion detection and bluetooth technology out of the box and includes a built in compass.
In 2016 the Micro:bit Foundation was formed and ownership transferred from the BBC.
The device supports motion detection and bluetooth technology out of the box and includes a built in compass.
Getting started with Code Kingdoms on Micro:bit
Intro
Code Kingdoms (aka CK) is a drag and drop editor for JavaScript available on the Micro:Bit.
Like other code editors on the MicroBit it comes with an introductory tutorial to help you get started which is what we’re going to work through now.
Controlling movement of your favourite Scratch character with PicoBoard Slider
Intro
After you set-up your PicoBoard, you can start playing with its different features.
In this tutorial you’ll learn how to use the PicoBoard slider to control movement of a character or Sprite in Scratch. We show you how to control the character’s vertical or horizontal position with the slider and how to watch the changes of the slider sensor’s value in real-time.
Run a creative making workshop for young people
Intro
Sometimes, with the emphasis on STEM education, the potential for creativity in making gets a bit lost in the mix.
This outline is for a small group workshop with children/families (ages 8+) that focuses on creativity and active learning while introducing learners to creative computing, basic circuits and even some computational thinking concepts by stealth.
Creative Making Workshop Guide
What is it
This guide was developed for families or young people ages 8+ and aims to introduce participants to different making concepts as well as the potential of these tools for creative expression.
Playing Drums with PicoBoard's resistance clips
Intro
The resistance clips have two different ways of feedback- either a resistance value of 0 to 100 or a connected Yes/No return value. In this tutorial we’ll show you how to use PicoBoard’s resistance connectors to play drums.
Bare Conductive's Electric Paint
What is it ?
Bare Conductive’s Electric Paint is like any other paint, except it conducts electricity. As a good alternative to jumper wires, it’s often used to paint sensors, draw circuits, repair PCBs or cold solder.
Thimble
What is it ?
Thimble is an online coding tool to help you learn or teach coding in HTML and CSS.
It’s part of the Mozilla WebMaker suite designed to help people gain skills in web literacy. As well as creating and publishing your own web page, you are also able to remix existing thimble projects https://thimble.mozilla.org/
Picoboard
What is it?
The PicoBoard (also known as ScratchBoard) is an open source board which, similar to MaKey MaKey, allows us to easily connect a Scratch program to the physical world.
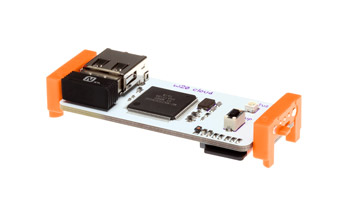
Cloudbit
What is it ?
Cloudbit is a LittleBits module that let’s you connect your LittleBits circuit with web services. This can be done via IFTTT, via the Cloud Control App or via the LittleBits API. Using IFTTT, you can connect to the CloutBit to control services like Twitter and Google Drive without needing to write any code.
Create your own meme with Thimble
Intro
Thimble is part of the Mozilla webmaker tools designed to help learn and teach coding in HTML and CSS.
You can create your own web pages or remix existing web pages and publish them online. This example will walk you through creating and sharing your own meme image by creating a simple HTML page and styling it using CSS.
What we want to create is something like this:

What you need
- Thimble is feely available to use via https://thimble.mozilla.org/. To save and publish your work, you’ll need to create an account.
- A meme image - To find public domain images to use for your meme, try the Public Domain Archive or Pixabay.
How
Start a new project with Thimble at: https://thimble.mozilla.org/
Click on ‘Start a project from scratch’
What we want to create is something with an image and 2 captions (as above).
When we start, we have the Thimble default page that includes a heading and a paragraph. The headings are assigned number levels so for a large header you use <h1> tags and for smaller headers you can use <h6>. HTML tags need to be opened and closed. So for our first header, we can change it to be:
<h1>First caption goes here</h1>
We won’t be using the paragraph for this project, so you can delete the <p>…</p> section.
You can update the title for your project too. Your project should now look something like this:
<!DOCTYPE html>
<html>
<head>
 <meta charset="utf-8">
<meta name="viewport" content="width=device-width, initial-scale=1">
 <title>My Meme</title>
 <link rel="stylesheet" href="style.css">
</head>
<body>
  <h1>First caption goes here</h1>
</body>
</html>
Now we need to add an image.
Add an image. you can upload new files using the file upload button on the left.
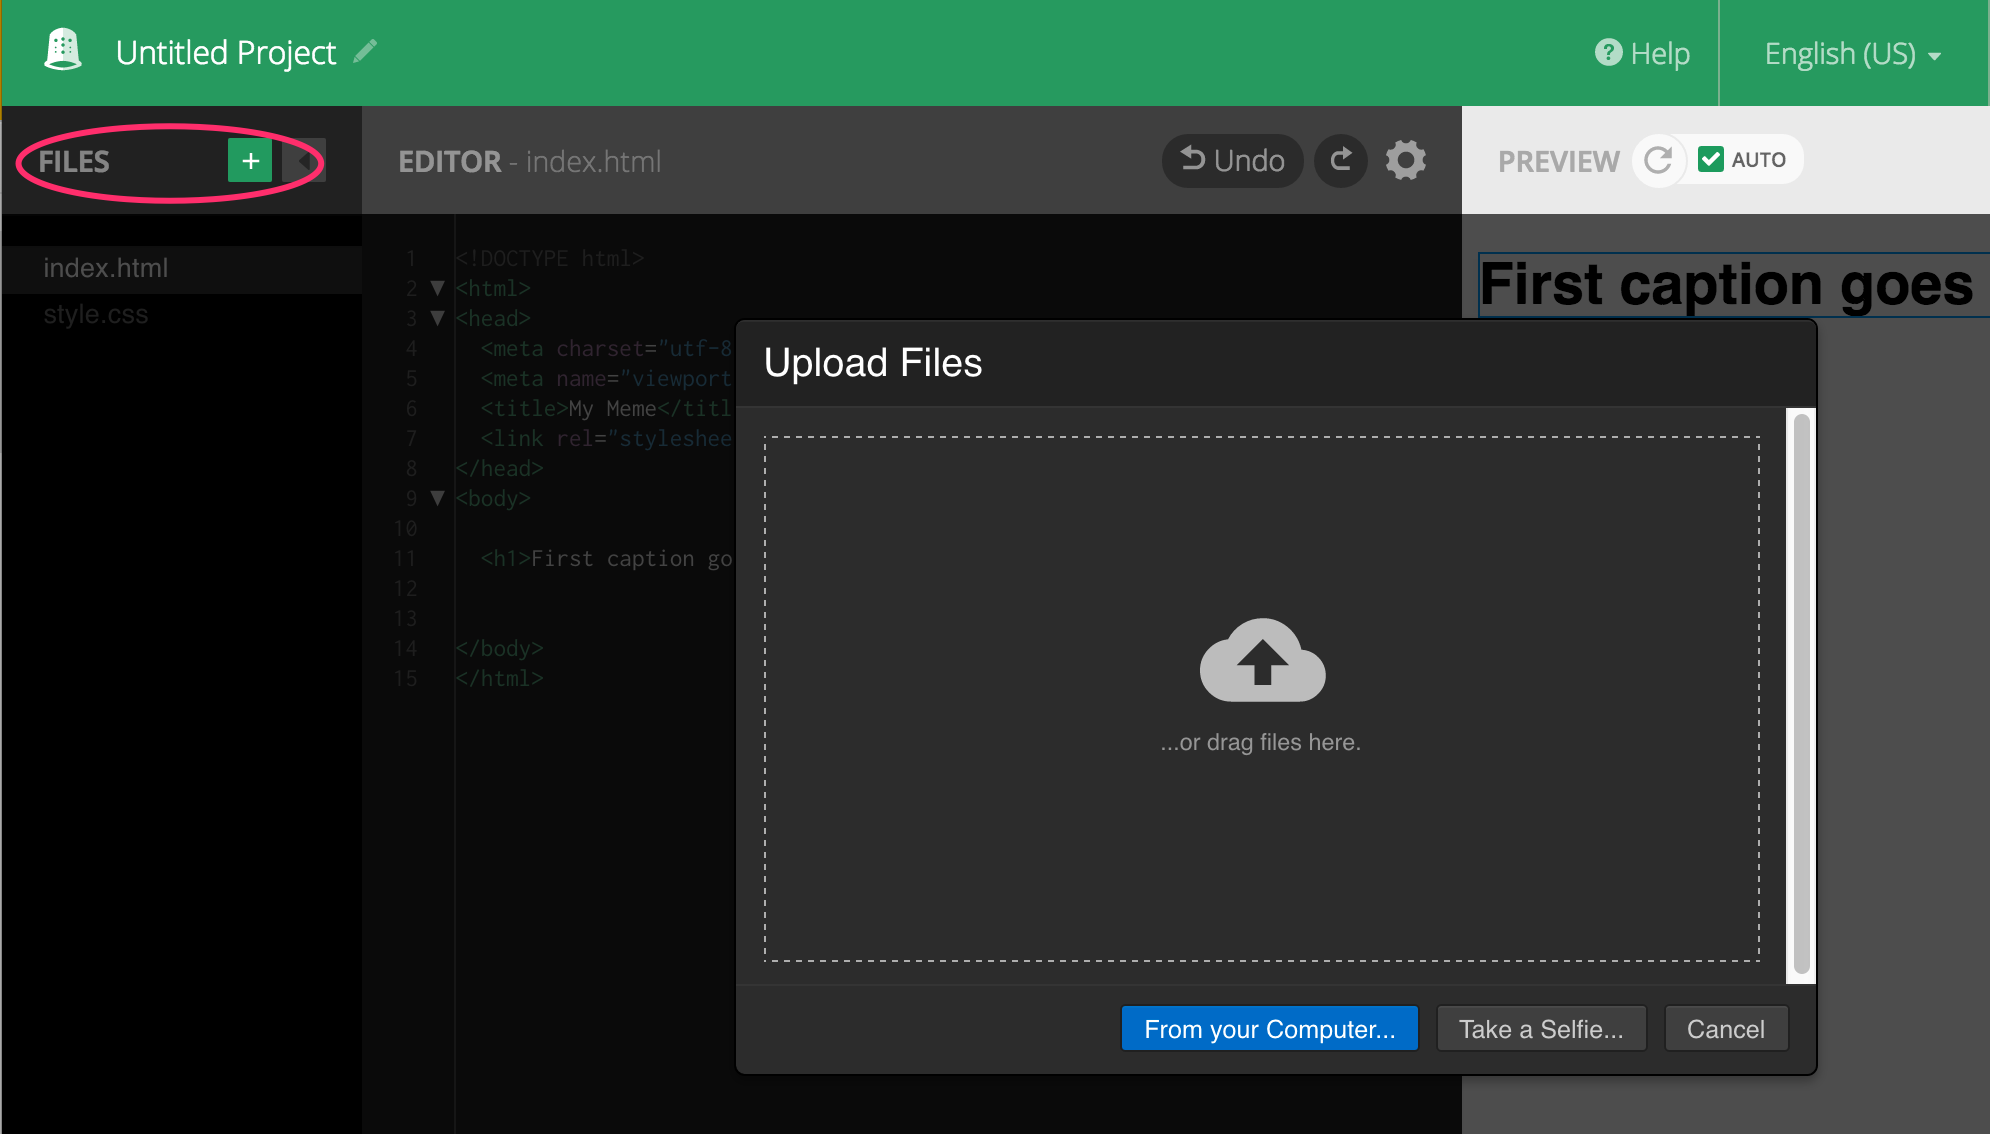
Your uploaded image should now appear in the file list (alongside the CSS and index.html file)
Under the <h1> tags, add an image tag that includes your image file name, like this:
<img src="cat-image.jpeg" />
Images are a bit different to other tags in that they don’t have open and closing tags, but have a self-closed /> at the end.
You can also set a width attribute for the image
<img src="cat-image.jpeg” width=700 />
You can now also add a second heading underneath the image. this time we will make it a second-level heading, using the h2 tag.
<h2> My second heading</h2>
The html page should now look like this:
<!DOCTYPE html>
<html>
<head>
  <meta charset="utf-8">
  <meta name="viewport" content="width=device-width, initial-scale=1">
  <title>My Meme</title>
  <link rel="stylesheet" href="style.css">
</head>
<body>

  <h1>First caption goes here</h1>

  <img src="cat-image.jpeg" />

  <h2> My second heading</h2>

</body>
</html>
But it doesn’t yet look quite right. To change how the page looks, we need to edit the CSS file. Cascading Style Sheets (CSS) allow you to change the appearance of your HTML elements. Click on style.css from the file menu to edit the stylesheet.
Here, you can see the style attributes for the body of the page. We can also add styles to different elements like the headings and images.
It’s quite common for the text on meme images to be all in capitals, so we can set our headings to be in uppercase and also change the colours of the page.
If you use a particular style more than once, you can use it as a class. for example if we give both the headings a class of ‘capitalise’ in the html file:
e.g. <h1 class="capitalise">Heading 1 goes here</h1>
We can then reference that in the stylesheet using a dot followed by the class name.
Update your stylesheet to look like this:
body {
  font-family: "Open Sans", sans-serif;
  background: #111111;
  color: #ffffff;
  }

.capitalise {
 text-transform: uppercase;
  }

h1 {
  text-align: center;
  }

h2 {
   margin-top: -2em;
   text-align: center;
  }

img {
   width: 750px;
   height: auto;
   }
Now, you can edit the text for your meme and make any additional changes to the styles that you want.

(something like this except funnier)
Once your meme is ready, click publish to share it with the world.
Credits
Partly inspired by the original Webmaker project by Laura Fleming (now archived)
Create a check-in point with littleBits
Intro
Cloudbit is a LittleBits module that let’s you connect your LittleBits circuit with web services. This can be done via IFTTT, via the Cloud Control App or via the LittleBits API. Using IFTTT, you can connect to the CloutBit to control services like Twitter and Google Drive without needing to write any code.
In this example, we’re going to create a notification checkin that will let people check-in at a particular location using CloudBit and IFTTT. When someone checks-in at the CloudBit location, you’ll receive an email notification.
What you need
- LittleBits CloudBit Kit and pressure sensor module.
- IFTTT Account
How
If this is the first time you have used your CloudBit, you need to first connect it to your wifi network via the Cloud Control. Go to the Cloud Control at http://control.littlebitscloud.cc and follow the instructions to connect to your network.
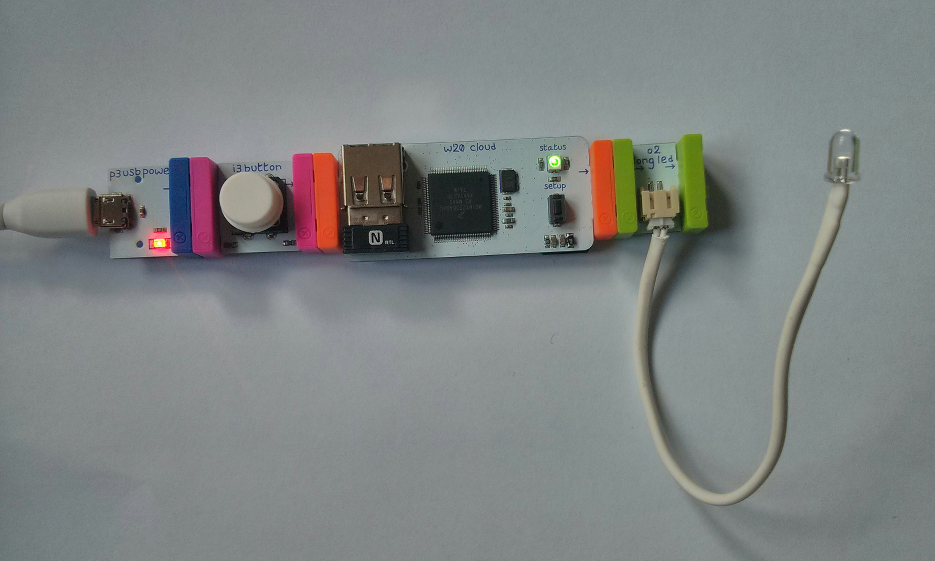
To test whether your CloudBit is correctly connected to the network, you need to set up a basic circuit. Put together the circuit by connecting the LittleBit power module (USB connected to the wall) to the CloudBit connector module. Connect this to a light output.
Your basic CloudBit circuit should look like this:
Log in to IFTTT and click on create recipe
First, we need to add a data source. This is the ‘this’ in the ifthisthenthat recipe.
Click on this and search for ‘Littlebits’ and connect to the channel.
In the next step, select your CloudBit module from the dropdown list and click the Create Trigger button.
Now, click that to set the action for your recipe.
We want it to trigger when our module is on. We’re using the Pressure sensor module so this will be when someone touches the pressure sensor.
Our notification can be sent by SMS, email or push notification. This can depend on the type of phone you use or how you’d like to receive notifications. In this case, we’ll use the gMail notifier action.
Now, complete the action fields by setting the text of your notification. Make sure it’s something meaningful. e.g. ‘’ someone is waiting at myLocation.
Give your recipe a name and click ‘Create Recipe’.
Now you can create a LittleBits circuit with a touch sensor and put it at your check-in point. Add a sign for your check-in device to make it nice and clear.
When someone touches the sensor, you will be notified by email.
Create a calendar notifier with littleBits
Intro
Cloudbit is a LittleBits module that let’s you connect your LittleBits circuit with web services. This can be done via IFTTT, via the Cloud Control App or via the LittleBits API. Using IFTTT, you can connect to the CloutBit to control services like Twitter and Google Drive without needing to write any code.
IFTTT (If This Then That) is a service that lets you connect to web apps and services to automate processes using simple conditional statements in the format If This Than That. The ‘If This’ part of the recipe is the trigger while (…Then That.) is the response. These statements are collated as ‘recipes’ that you can share and reuse.
IFTTT to make it super easy to control web applications like Facebook, Twitter or Google Drive, or communicate via SMS and Gmail- all without writing a single line of code.
What you need
- LittleBits CloudBit Kit
- IFTTT Account
- Google Calendar or Office 360 Calendar
How
If this is the first time you have used your CloudBit, you need to first connect it to your wifi network via the Cloud Control. Go to the Cloud Control at http://control.littlebitscloud.cc and follow the instructions to connect to your network.
To test whether your CloudBit is correctly connected to the network, you need to set up a basic circuit. Put together the circuit by connecting the LittleBit power module (USB connected to the wall) to the CloudBit connector module. Connect this to a light output.
Your basic CloudBit circuit should look like this:
Log in to IFTTT and click on create recipe
First, we need to add a data source. This is the ‘this’ in the ifthisthenthat recipe.
Click on this and search for ‘Calendar’. You should get the option to connect the Google Calendar, Kyber or Office 365.
Select the Calendar channel you want to connect with.
If this is your first time connecting this Channel, IFTTT will request permission to access your calendar data. You need to approve this to continue.
Once you’ve connected the channel, you need to select what type of trigger you want to use. This is what sends the signal for your recipe to fire and can be the beginning of an event, a new calendar appointment added or based on the start of events matching a particular keyword.
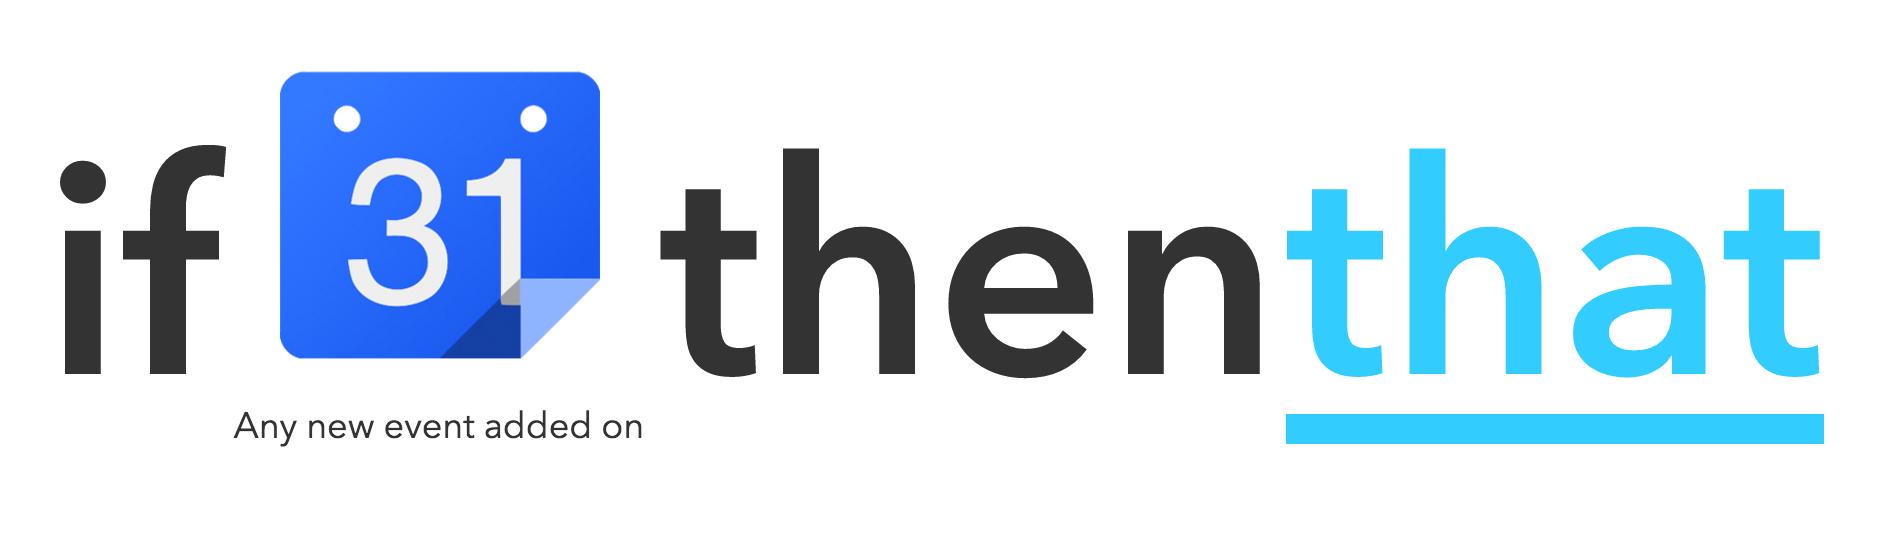
In this example we’re going to set the trigger to be when a new event is added to our calendar.
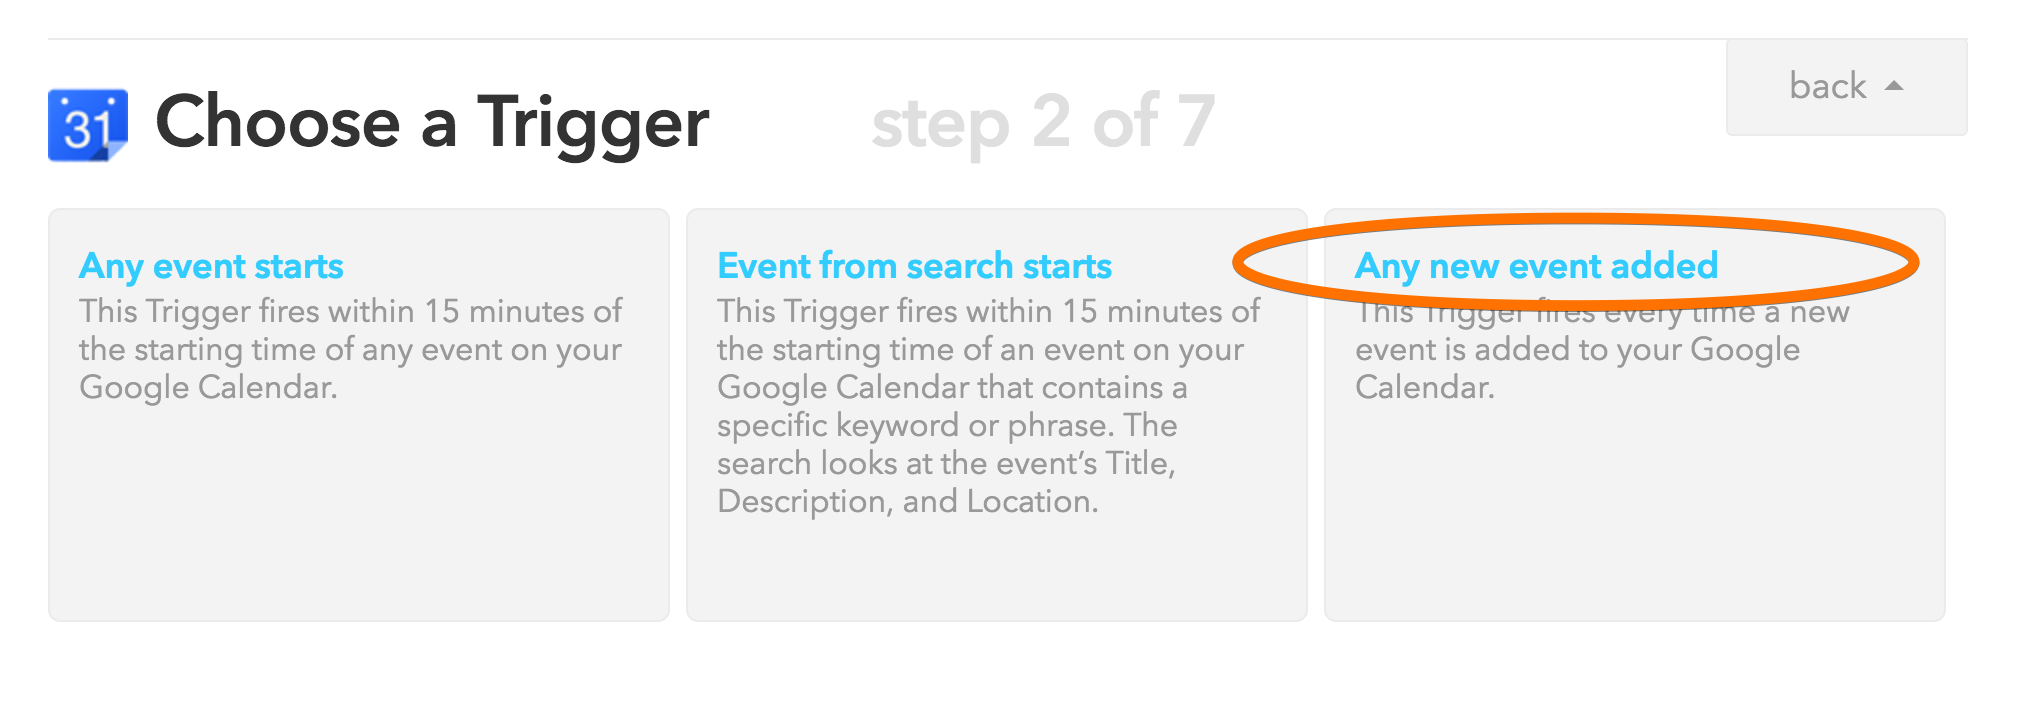
Because there’s no additional fields to set for this trigger, we can just click Create Trigger to skip step 3 of our recipe setup.
It’s now time to set the follow up action for our recipe. The that of the equation.
Click on that and search for the LittleBits Action channel. Clicking on the LittleBits channel gives you three options for your action.
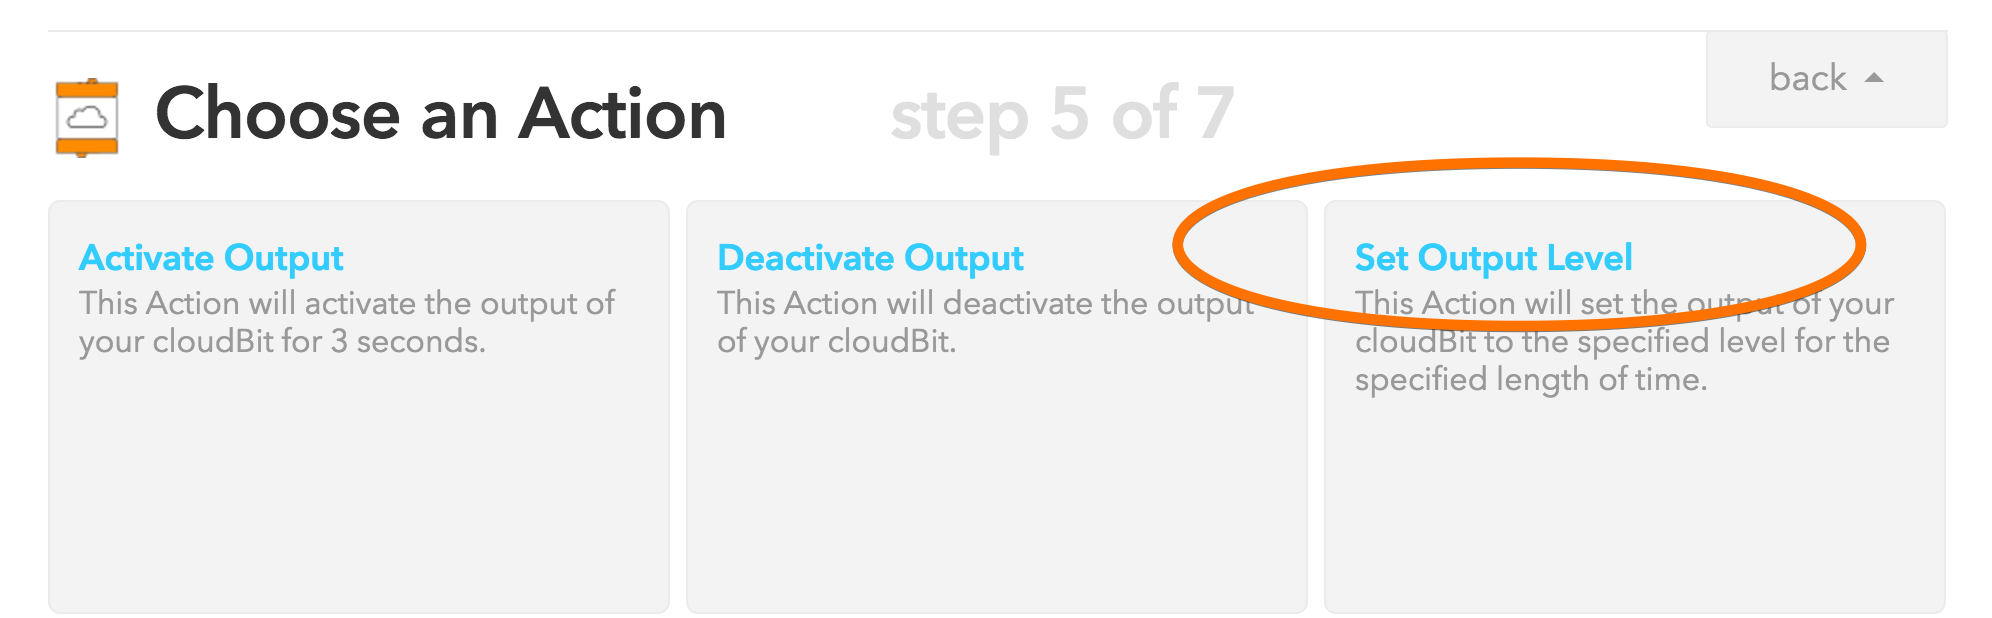
The Activate Output option activates your LittleBits module output for 3 seconds while the Deactivate Output option will basically switch off the output of your module.
The Set Output option gives us a few more options to work with so we are going to select this one.
You need to select your CloudBit module from the dropdown list. This is the name you gave your CloudBit when you first set it up.
Next, set the output level. As we’re using an LED, we can set the output to 100%.
And we want the duration of the notification light to be long enough for us to notice it, so we can set this to 15 seconds.
Once your action is set, you can click the Create Action button.
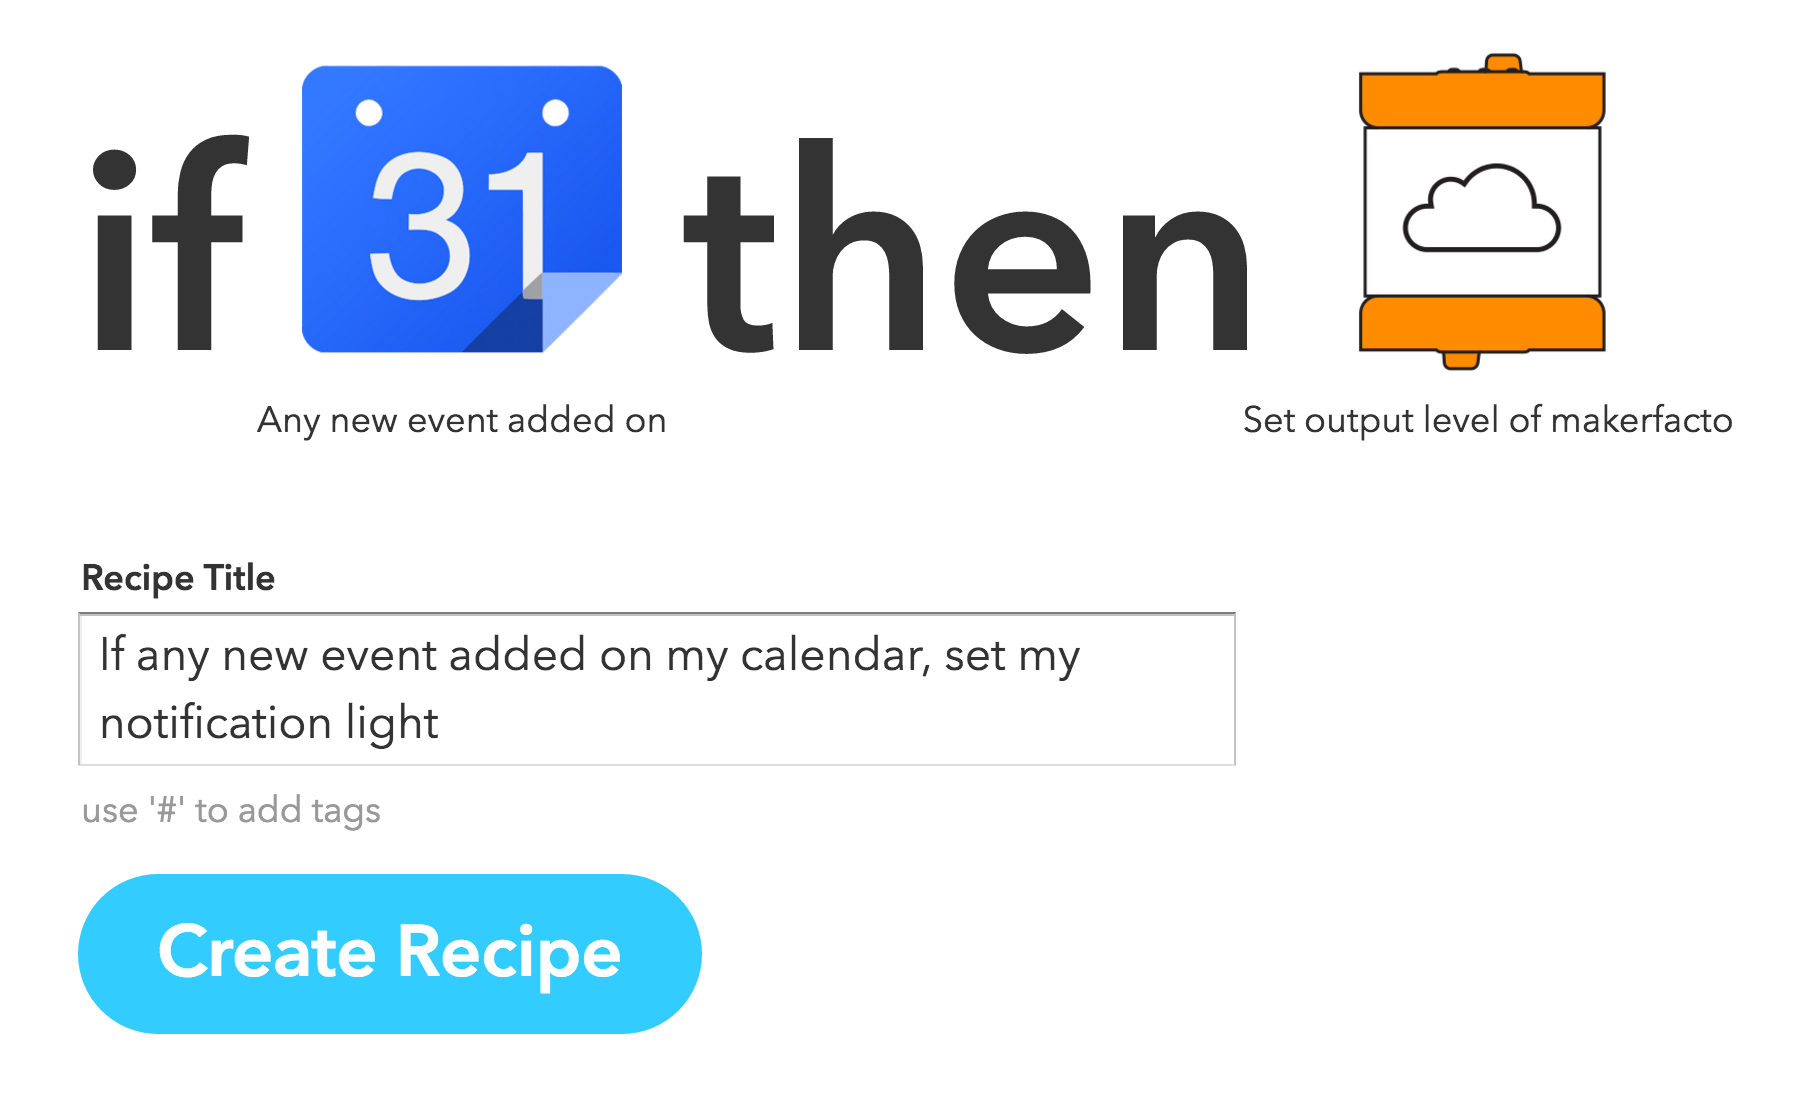
Now, give your recipe a meaningful name and click Create Recipe.
You’ll then be redirected to the recipe page where you can test it out by clicking on ‘Check Now’. You can also view the recipe log to make sure everything is running ok.

If your recipe is running ok, add a new event to your calendar and watch your LED light turn on to notify you.
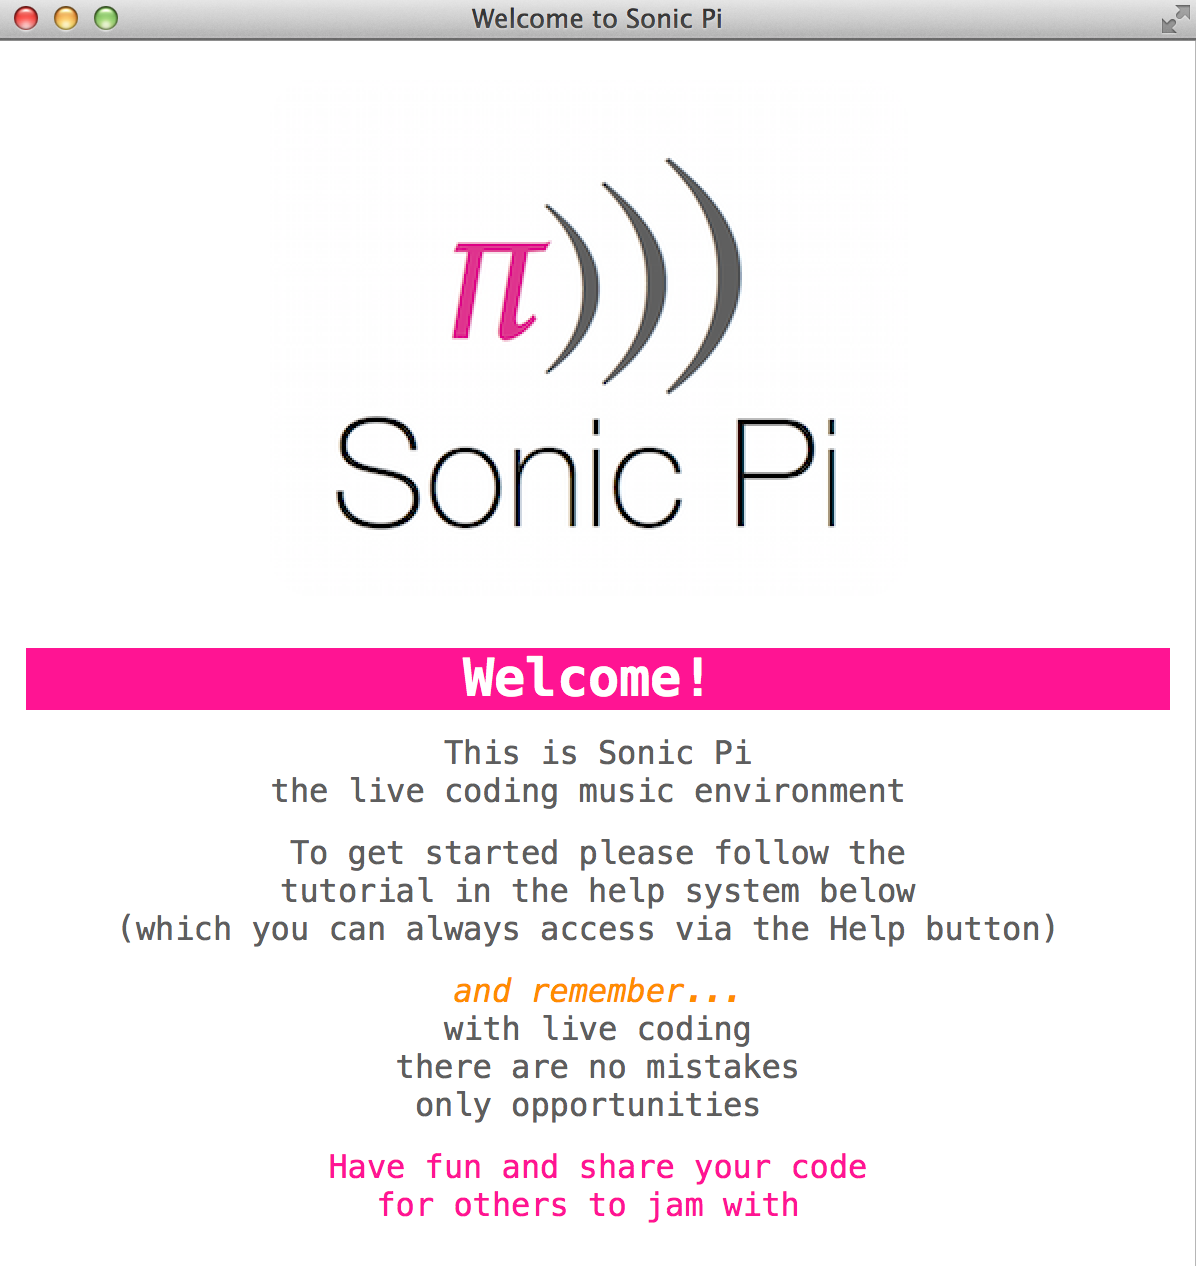
Sonic Pi
What is it ?
Sonic Pi is a programming environment developed by Dr Sam Aaron (from the University of Cambridge Computer Laboratory) to teach programming concepts via a live coding instrument. Often described as ‘The Live Coding Synth for Everyone’, it’s based on the Ruby programming language and can be used both as a teaching resource and as a musical instrument.
Recipes
https://nhs.io/sonicpi/ - Introductory ‘parent friendly guide’ by Paul Bradley.
More info
Getting started with Sonic Pi (LibraryMakers)
https://www.raspberrypi.org/magpi/issues/essentials-sonic-pi-v1/
Getting started with Sonic Pi
Installing SonicPi
SonicPi comes installed on the latest versions of Raspbian (the Debian flavour created for the Raspberry Pi) but you can also install it directly on earlier versions by typing the following command at the command line.
$ sudo apt-get install sonic-pi
Once installed you can access Sonic Pi via the desktop:
$ type startx
There are also versions available for Windows, Mac and Linux that you can download from http://sonic-pi.net/
The official tutorial
The first thing you’ll notice when you first launch Sonic Pi is that it directs you to a tutorial. You can access the different parts of the tutorial from the bottom pane, underneath the main code editor panel.
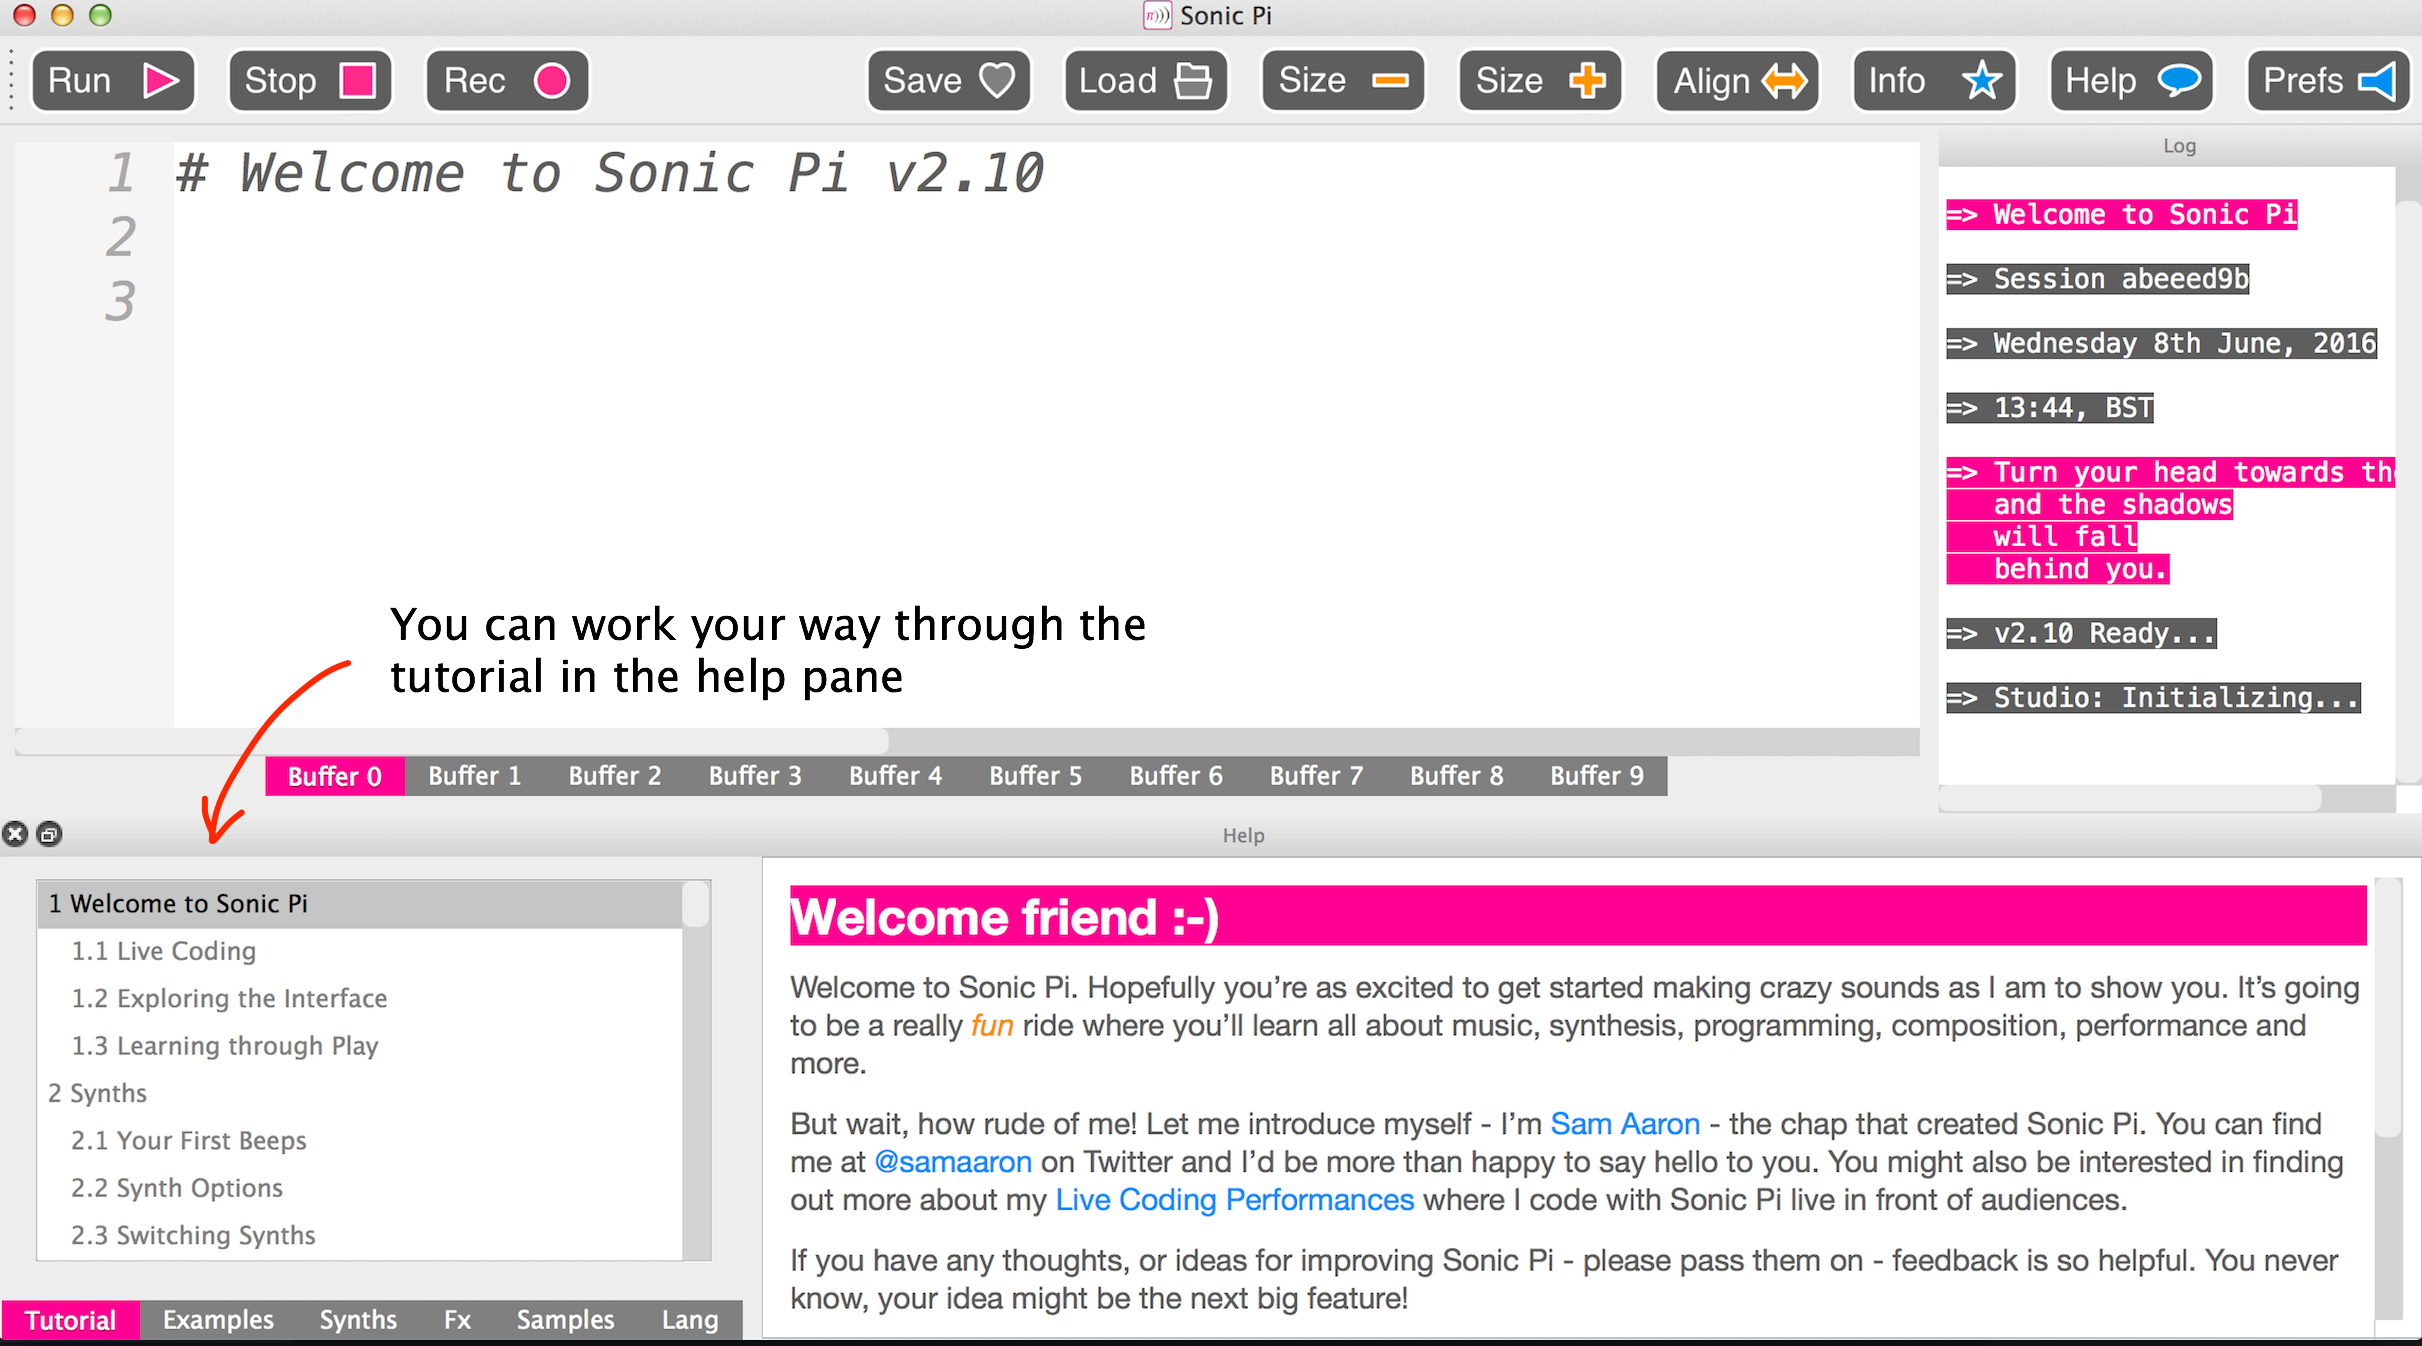
This tutorial will introduce you to the Sonic Pi and the different parts of the Sonic Pi interface. It will also walk you through your first program and help you learn a bit about coding in Sonic Pi.
The interface
The main parts of the Sonic Pi interface are the Code Editor, the main menu, the Help panel and the Log Viewer.
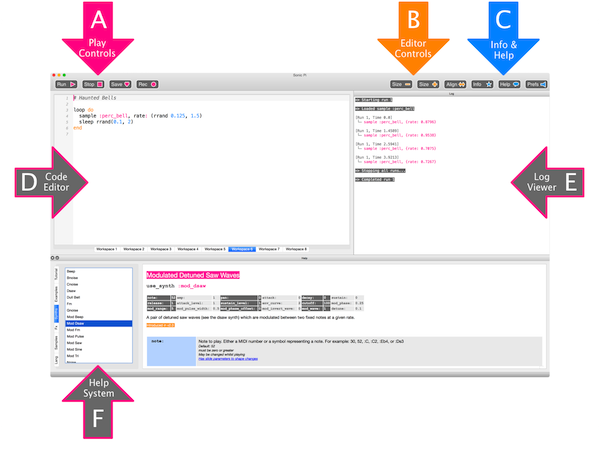
The Run and Stop buttons in the main menu are how you start and stop your script. In the main menu, you can also save and open files, open and close the help panel and change your preferences configuration.

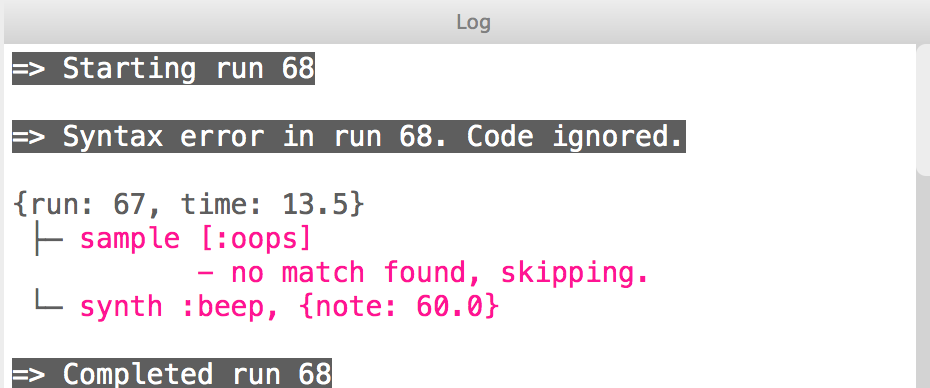
You can see the output of your running program in the Log Viewer.
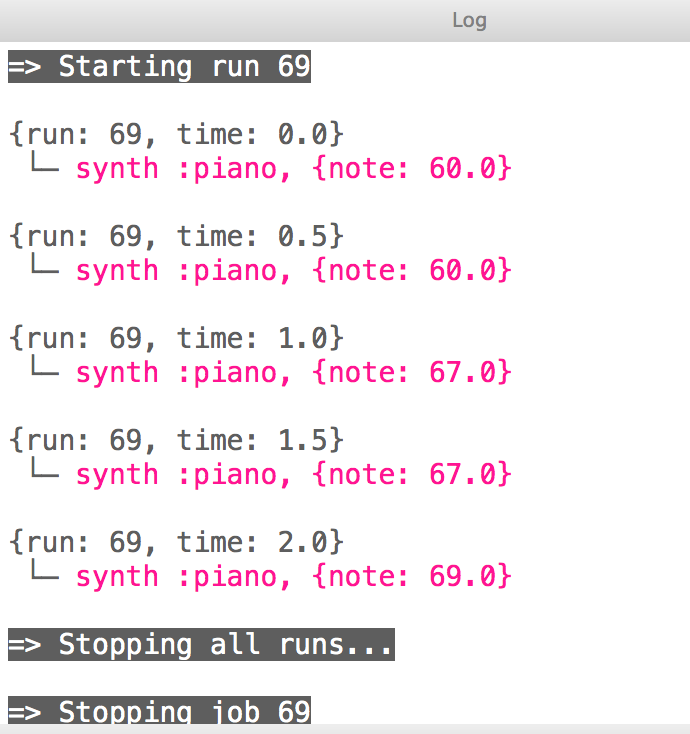
As well as showing you what the code is running, the log window will also tell you if there are any errors.
Coding your first music with Sonic Pi
Intro
Here, we’re going to write our very first Sonic Pi program. This will cover the basics of coding with Sonic Pi, but if you haven’t used it before you can check out the introductory guide here.
Coding with Sonic Pi
The most basic code you can write with Sonic Pi is play followed by a number. The number represents the musical pitch, lower numbers make lower pitched beep and higher numbers make higher pitched beep sound.
play 75
The notes are based on the notes on a piano (it uses MIDI keyboard numbers). So, if you type play 60, you are telling the program to play the 60th note on the piano.
You can use the sleep option (followed by the duration) to add a break between notes. For example:
play 60
sleep 0.5
play 62
sleep 0.5
play 64
sleep 0.5
play 60
sleep 0.5
This combination will play everyone’s favourite tune, Frère Jacques.
But you don’t have to use the MIDI numbers if you know the notes. You can use notes in Sonic-Pi too.
play :C
sleep 0.5
play :D
sleep 0.5
play :E
sleep 0.5
play :C
sleep 0.5
If we want to play it through more than once , we wrap it in a loop specifying how many times to run the program using do and end.
 2.times do
  play 60
  sleep 0.5
  play 62
  sleep 0.5
  play 64
  sleep 0.5
  play 60
  sleep 0.5
end
If we want to keep repeating a particular piece of music, use a forever loop:
loop do
  play 60
  sleep 0.5
end
You can specify the synth to use to change the sound.
use_synth :fm
 2.times do
  play 60
  sleep 0.5
  play 67
  sleep 0.5
end
The synth options (like other code in Sonic Pi) will autocomplete so you can try out different ones at random or you can refer to the list of available synths from the help panel at the bottom of the screen.
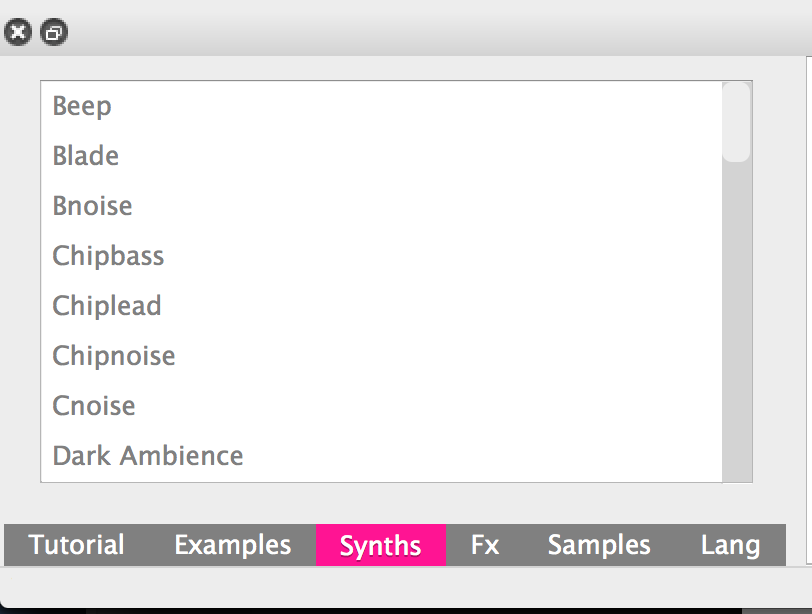
And you can add samples. Select samples on the left hand side of the help window to browse through the samples and how they can be used.
2.times do
 sample :loop_amen
 sleep 1.753
end
Let’s add a backbeat (because everything is better with a backbeat).
To play more than one thing at a time, you can wrap your code together using threads.
# Frère Jacques again - this is a comment in
# the code, they always start with a # symbol

thread do
 use_synth :beep
 loop do
  sample :drum_cymbal_closed
  play 60
  sleep 0.5
  play 62
  sleep 0.5
  play 64
  sleep 0.5
  play 60
  sleep 0.5
 end
end
And what about if you are still creating and you want to change things as you go? You can use live_loops to create music on the fly. Change the sample and click Run again to hear the new version instantly.
You need to give your live loop a name, something descriptive so you can keep track of what it is. Ours is called breakbeat_backbeat.
live_loop :breakbeat_backbeat do
  sample :loop_breakbeat
  sleep 2
end
You can use lots of live_loops at a time to play different samples, beats and notes simultaneously.
There are lots of options and additional functionality to discover with Sonic Pi but this is enough to get you started coding your very own music.
Create Interactive Drawings With MaKey MaKey and Soundplant
Info
Have you ever wanted to add a sound effect to your pencil drawing? Sounds cool, right?
The magic lies in the fact that pencil lead is graphite, a form of carbon, which due to the vast electron delocalisation within the carbon layers can conduct electricity.
What you need
- MaKey MaKey (including Mini-B USB cable)
- Paper
- Graphite pencil (a school pencil will do, but a graphite pencil is more reliable)
- Alligator clips
- Soundplant software
- Computer (any Windows or Mac of the past 8 years will do, but for optimal performance a multicore processor and 4GB RAM is recommended)
- Sound files
How
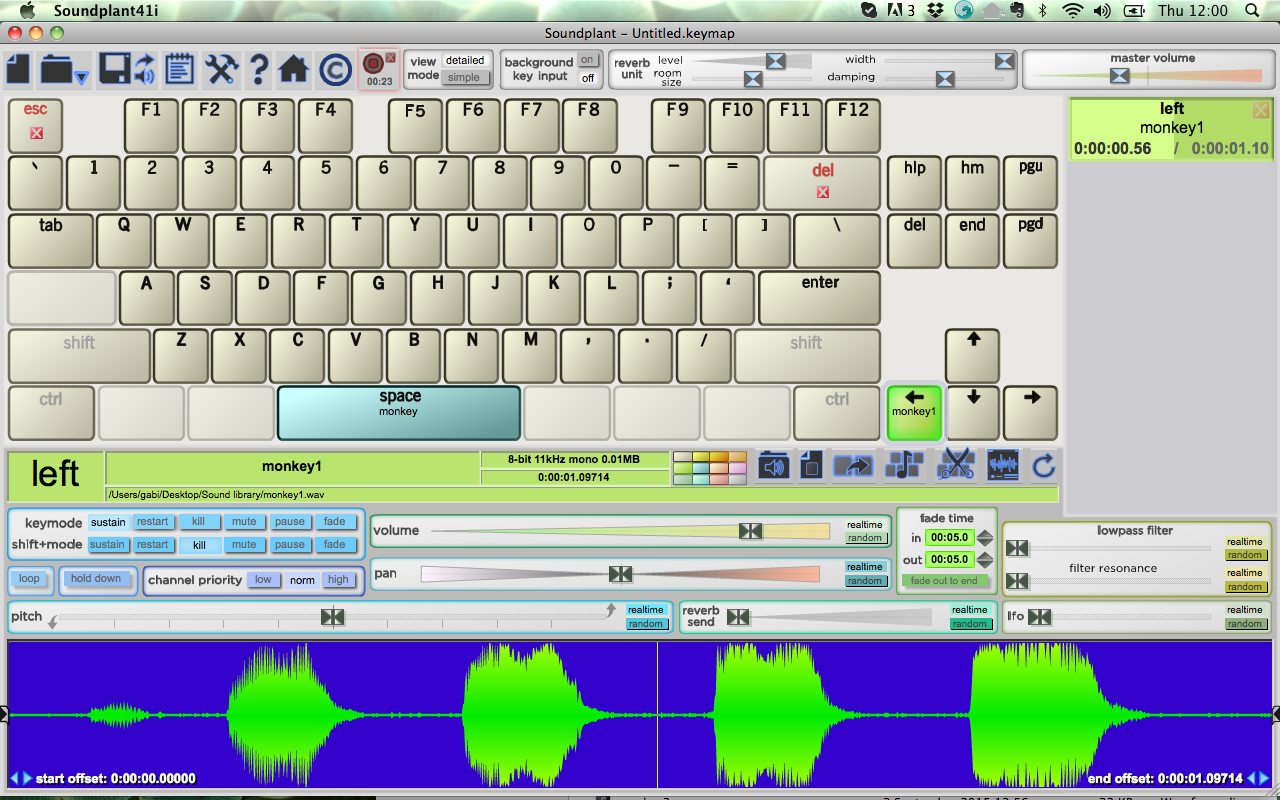
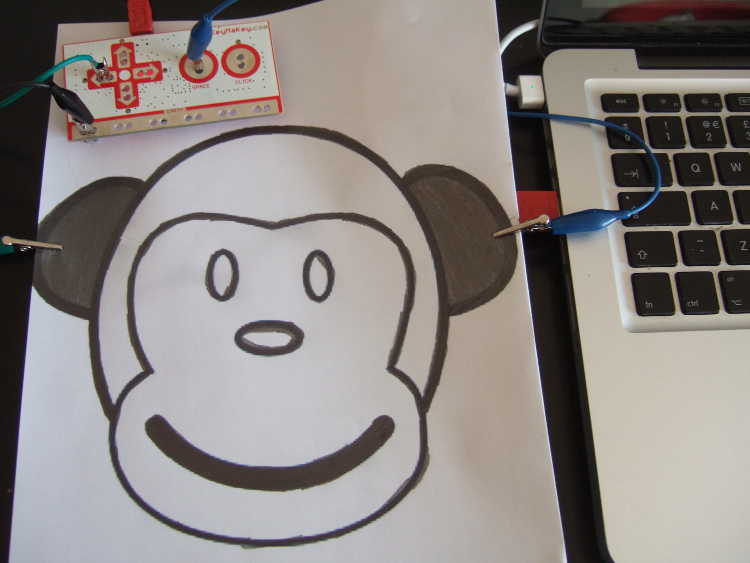
- Draw a picture on a piece of paper with a graphite pencil. Make sure the lines are thick and unbroken. In our case we drew a monkey head with big ears that we coloured in.
- Connect MaKey MaKey into your computer using USB cable. Plug the small side of USB cable into MaKey Makey and the big side into your computer. (If your computer asks you to install the drivers, simply click cancel or close the window.)
- Open this link on your browser http://soundplant.org/ to access and download the Soundplant software.
- Open Soundplant. Make sure it is open on your screen all the time.
- Drag and drop your sound files onto the keyboard keys you would like to use on Soundplant. In this case we assign individual sounds (monkey sounds) onto “left arrow’ and “space” keys.
- Connect to Earth - Now you can connect one end of an alligator clip to the bottom of MaKey MaKey which is marked as “Earth”.
- Connect to Yourself - Then you hold the other end of the alligator clip (the metal part) between your fingers, and now you become “grounded”.
- Connect MaKey MaKey to your drawing - If you want your drawings to become your keyboard keys, you connect them to your MaKey MaKey with the help of alligator clips. On the front side of MaKey MaKey you find “space” and “left arrow”. Connect them with two alligator clips to two parts of your graphite drawing. In our case, we connected MaKey MaKey “space” and “left arrow” to the monkey’s ears.

- Touch the monkey’s ears and play sounds! (Don’t forget the step 7)
Create Interactive Drawings With MaKey MaKey and Scratch
Info
Do you love drawing? We do. But wouldn’t it be cool to use your pencil drawing as a remote control?
Here we’re going to show you how to move a Scratch sprite with a drawing you’ve made.
You may ask how it’s even possible.
The magic lies in the fact that pencil lead is graphite, a form of carbon, which due to the vast electron delocalisation within the carbon layers can conduct electricity.
Not familiar with Scratch? No worries, this step-by-step recipe will help you get started.
What you need
- MaKey MaKey (including Mini-B USB cable)
- Paper
- Graphite pencil (a school pencil will do, but a graphite pencil is more reliable)
- Alligator clips
- Scratch software
- Computer
- Sound files
How
- Draw a picture on a piece of paper with a graphite pencil. Make sure the lines are thick and unbroken. In our case we drew a monkey head with big ears that we coloured in.
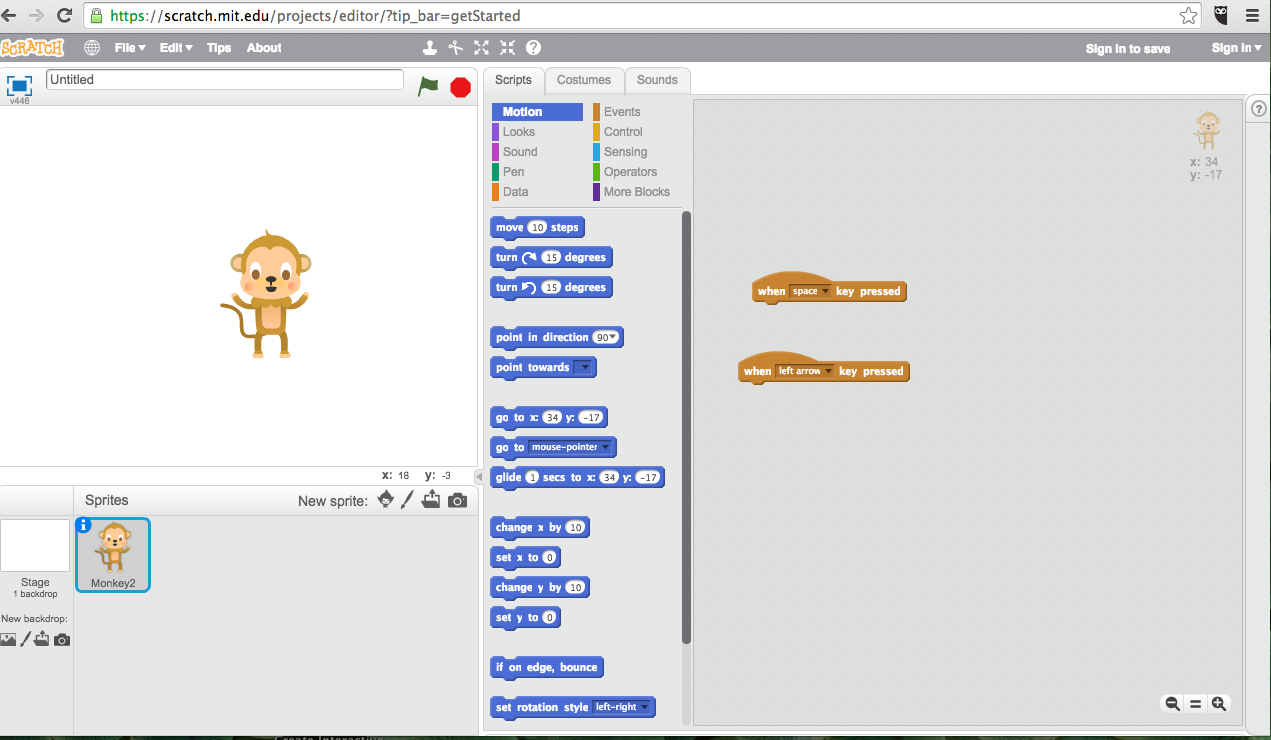
- Open this link on your browser https://scratch.mit.edu/ to access the Scratch software.
- At the Scratch site, click on ‘try it out’ and start to explore it. In this case we want to substitute a cat sprite for a monkey. To do so we choose a monkey sprite from an existing Scratch library. Once we have a new sprite on the stage, we right click the original cat sprite and delete it.
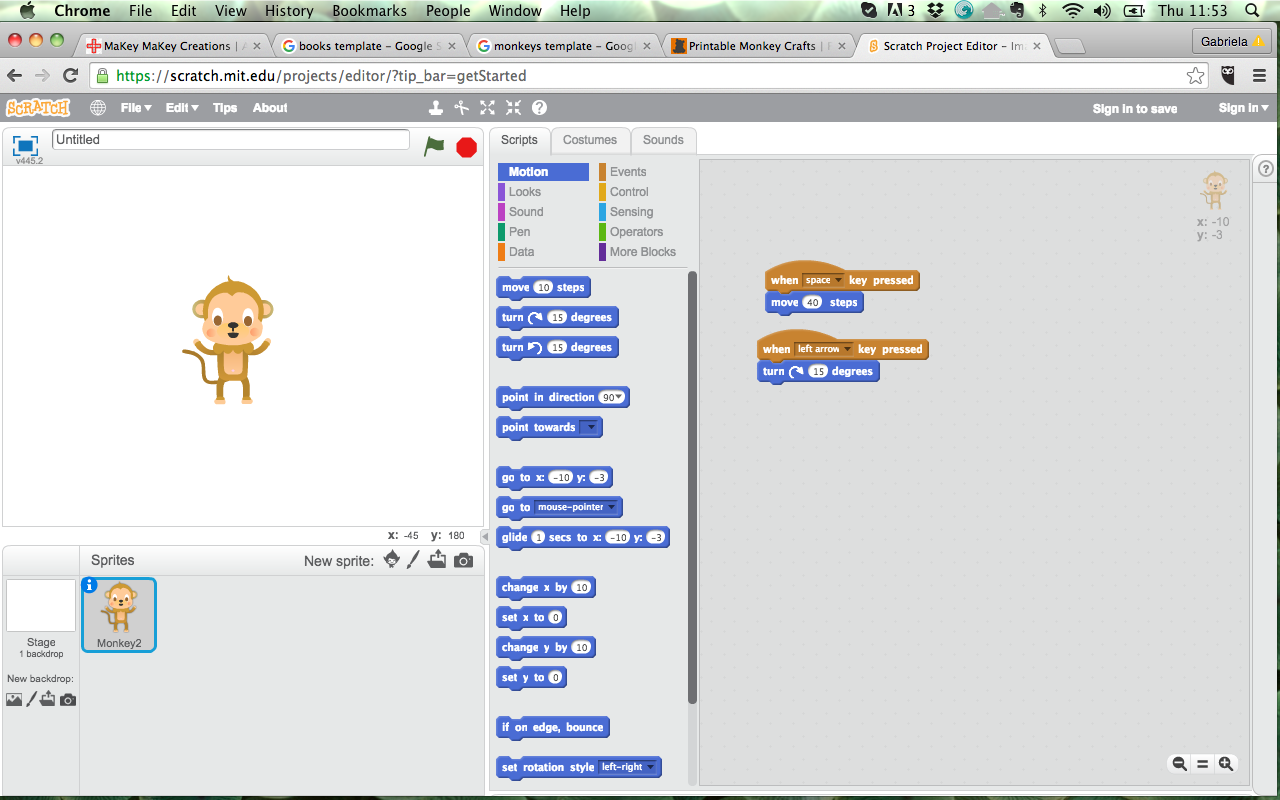
- Now we want to control our monkey’s movement. We want to be able to control it with “space” and “left arrow” keys. To do so we choose “event” and drag ‘when space key pressed’ block to the right area. Then we make a duplicate and change ‘space’ for ‘left arrow’.
-
We want the sprite move 40 steps when space key is pressed and turn clockwise 15 degrees when left arrow is pressed. We choose “movement” and drag ‘move 40 steps’ and ‘turn 15 degrees’ to the right area.
- Now it’s time to connect MaKey MaKey into your computer using USB cable. Plug the small side of USB cable into MaKey MaKey and the big side into your computer. (If your computer asks you to install the drivers, simply click cancel or close the window.)
- Connect to Earth - Now you can connect one end of an alligator clip to the bottom of MaKey MaKey which is marked as “Earth”.
- Connect to Yourself - Then you hold the other end of the alligator clip (the metal part) between your fingers, and now you become “grounded”.
- Connect MaKey MaKey to your drawing - If you want your drawings to become your keyboard keys, you connect them to your MaKey MaKey with the help of alligator clips. On the front side of MaKey MaKey you find “space” and “left arrow”. Connect them with two alligator clips to two parts of your graphite drawing. In our case, we connected MaKey MaKey “space” and “left arrow” to the monkey’s ears.
- Touch the monkey’s ears on your drawing and control movements of the sprite! (Don’t forget the step 7)
Learning the Scratch user interface
This focuses on the Scratch 2.0 editor, though it’s similar in layout to the interface of earlier editions of Scratch.
The main editor

Available at: https://scratch.mit.edu/projects/editor/
Getting to know the scratch interface
To create with Scratch, it helps to be familiar with the different parts of the Scratch editor interface.
The main areas to be familiar with in the Scratch editor is the stage, the scripts area, block palette, the sprites pane and main menus.
The scripts area
This is where you can drag and manipulate blocks of code to make your Scratch project.
To remove something from your Scripts area, just drag it back onto the blocks palette.
Sprites Pane
The sprites pane includes thumbnails of the sprites your current project uses. To edit the script of a particular sprite, it needs to be selected in the Sprites pane.
Block Palette
The block palette is made up of different ‘blocks’ of code that you can drag and drop onto the scripts area.
The code blocks are colour coding by block groups so you can easily find a block based on its colour. The block categories are Motion, Looks, Sound, Pen, Data, Events, Control, Sensing, Operators, and More Blocks.
What is a sprite?
A sprite is an object that performs actions in Scratch. Sprites are the only part of your project that can move.
What is a stage?
Stages, on the other hand, are the backdrops in your project.You can make changes to these backdrop images but they don’t move and can’t perform actions based on the scripts you create.
![]()
Create a conversation with Scratch
Intro
With Scratch, you can create simple stories using different characters. In this example, we will create a simple conversation between two characters.
If you’re not familiar with the Scratch editor interface, see this intro.
This is what we are building (though this is just an outline that you can create your own story from)
How
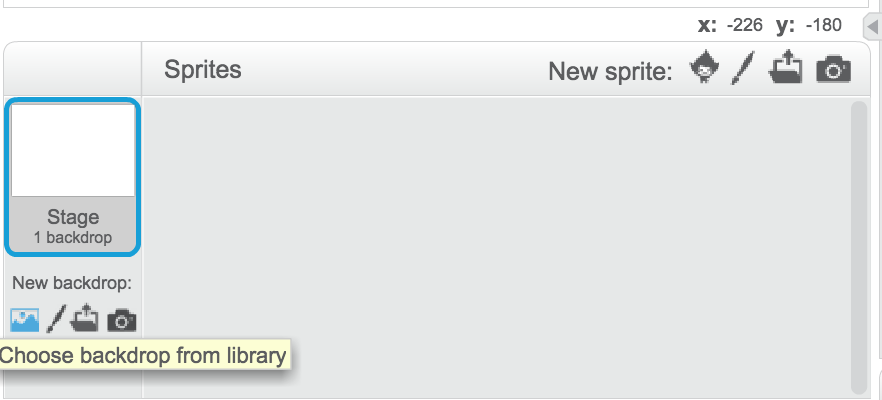
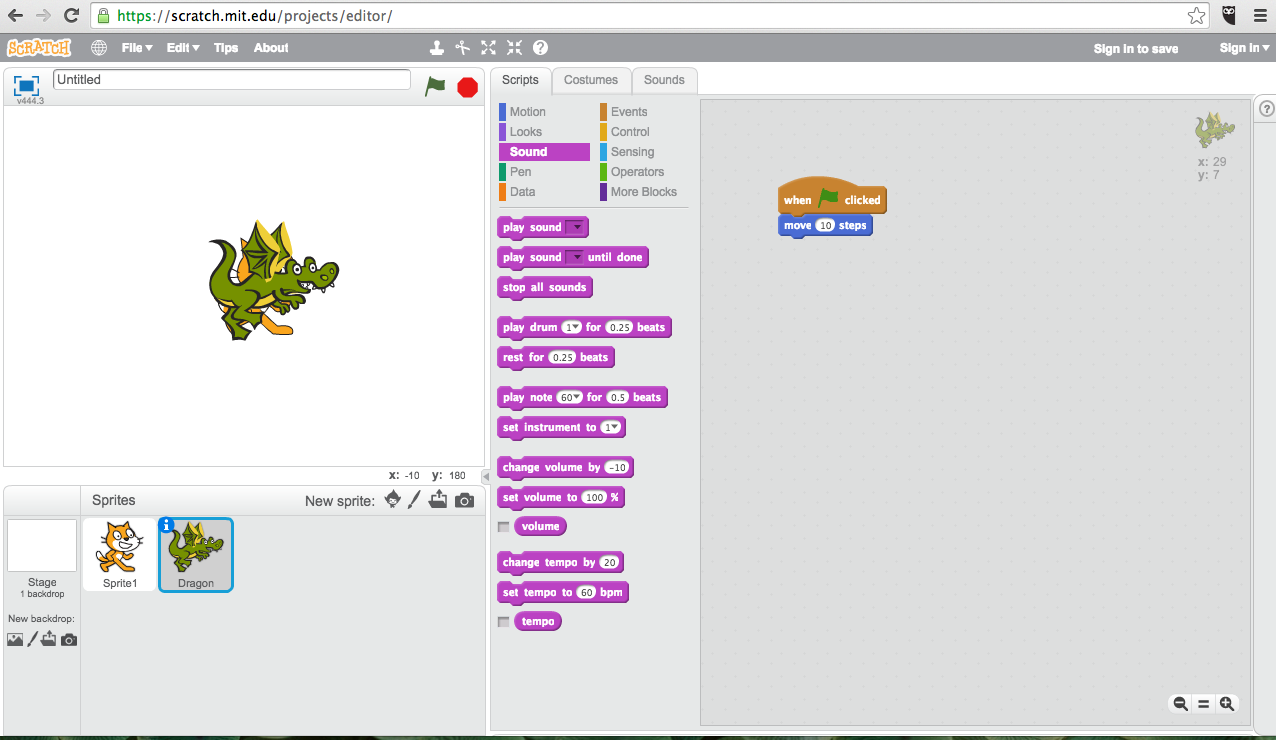
The first thing to do is to choose your ‘Sprite’. To remove the default Sprite (Scratch cat), right-click on the sprite icon and choose ‘Delete’.
![]()
You can then add a new sprite from the sprite gallery.
![]()
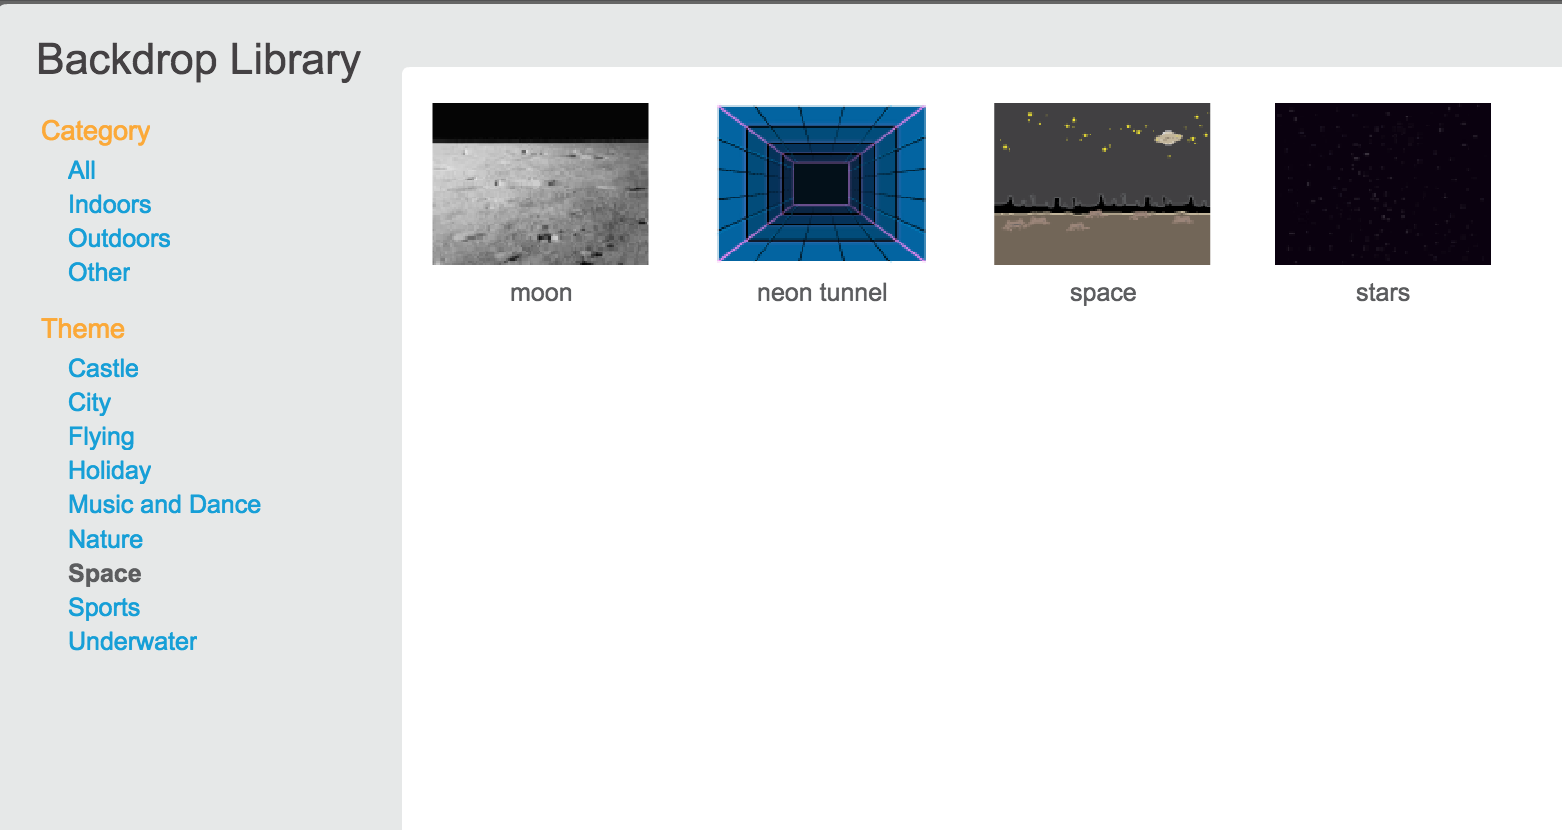
We can add a backdrop to help set the scene for our conversation to take place. Click on the ‘New backdrop’ option and choose where you’d like to set your story.
Choose whatever backdrop you want for your library. For this example, we’re going to use one of the Space backdrops.
Now, let’s add our first conversation script.
We start with a ‘When Flag Clicked’ block. It looks like this and you can find it under the Events category:
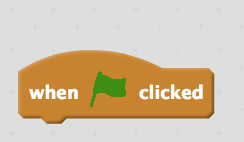
This means the script will start running when we click the green flag icon that appears at the top of the stage.

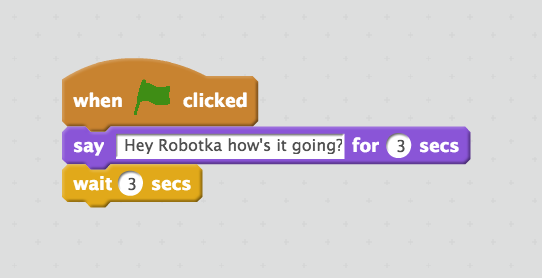
Then add a dialogue block. It’s found in the Movement palette. You can add whatever greeting you want here.
Next add a wait block. This gives the pause in the conversation where another character can reply.
Your script should now look like this:
Let’s add a second character for our robot character to talk to. As before, add a new Sprite from the sprite library. Select the new sprite and add a script that continues the conversation.
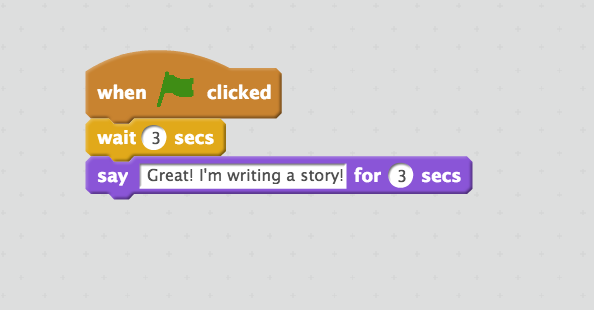
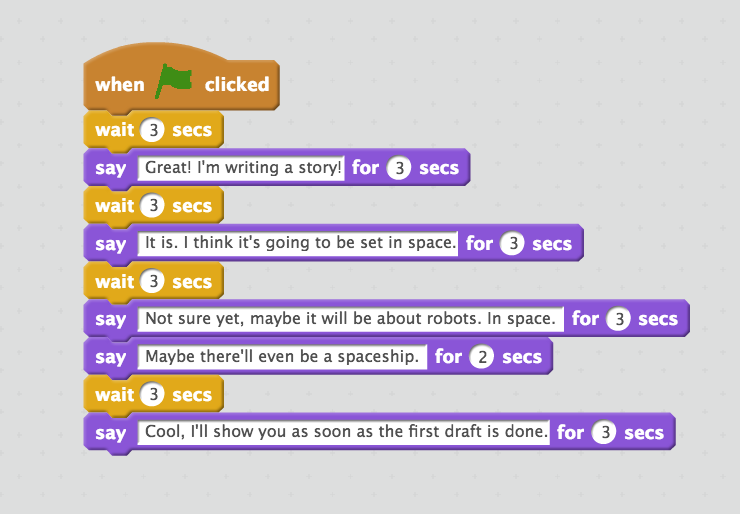
The conversation exchange is all about timings. Make sure that each character is given time to say something and hear the reply.
You can see that the length of time the first character is speaking and the time the second character waits match.
You can add additional wait and say blocks to keep the conversation going.
Our first character’s script looks like this:
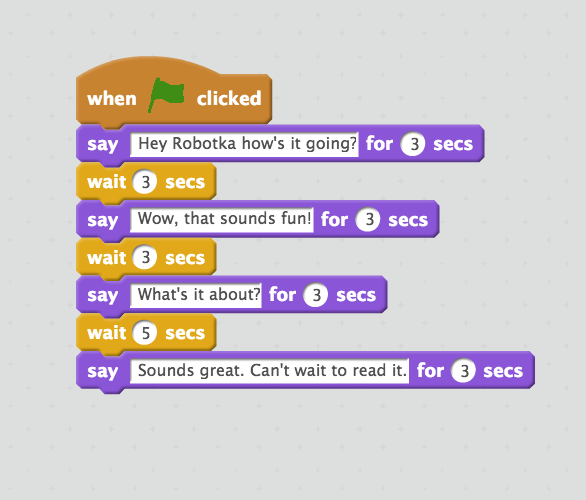
And the second character’s script looks like this:
You can extend the story further with additional sprites and backdrops.
Digital making event planning checklist
Intro
Each event will be different and will depend on the audience and the type of event you are planning but hopefully this checklist can help you get started.
First steps
- Plan out the objectives for the event. These could be learning objectives, promotion, outreach or a combination of things but it’s helpful to have a clear picture of what the aim of the event is
- What’s the target audience? This includes skill level, age and maximum attendance.
- Get the team together - Who will be involved? Deciding on roles and responsibilities as early as possible can help things run a bit smoother and ensure people are clear on who’s responsible for what.
A month before
- Put posters up, distribute leaflets and notify any local press who might be interested. Also make sure to announce your event in newsletters and other communication channels with your library users.
- Make sure the event is in all the local calendars as well as your own.
- Is the space booked? If you have to book specific rooms or areas of the library or venue, make sure this booking is firmly in place. And then check it again just to be sure.
- Time to start tweeting about the event
- If you are providing refreshments for the event, confirm the amounts required and any special dietary requirements and the timings of any refreshment breaks planned.
A week before
- Print out materials you will need to use on the day, such as a mailing list signup form or handouts for the activities planned.
- Equipment audit - create a list of the equipment that will be used on the day, including extension cables, adapters, numbers of each item and who will be responsible for it.
- If there are any extra steps or limitations for users joining your WiFi network, now’s the time to find out, document and test this. This can mean checking the connection process for different devices and on different operating systems.
- If there are other organisers/presenters/organisations involved, send out a reminder email confirming times, venue and contact information.
On the day
Get the venue ready
- Put signs to the venue from outside to help new visitors find their way.
- Make sure other staff are updated and ready to point your attendees in the right direction
- Signpost toilet facilities, prayer rooms and disability access points
- Check if there are any fire drills planned that you should forewarn attendees about.
- Arrange the workspace furniture for maximum participation and collaboration.
Technical setup
- Make sure there are plenty of power sockets that are easily accessible
- Wifi details are readily at hand and ideally posted around the venue.
- Tech support (in whatever form that takes) is both forewarned and on speed dial.
- Are you archiving the tweets for the day?
Follow up
- Don’t lose the momentum at the end of the day - Be ready to communicate next steps to the people who attend your event. This can include ensuring people know if they can find or share blog posts about the event, how to contact you or other organisers and if future events are being planned.
Other things to consider
- Photography permission - It’s always nice to notify people if you plan on taking photos or recording the event. If young people are attending your event, make sure you get the permission of their parents for any photography.
References
Intro to Ozobot
What is it ?
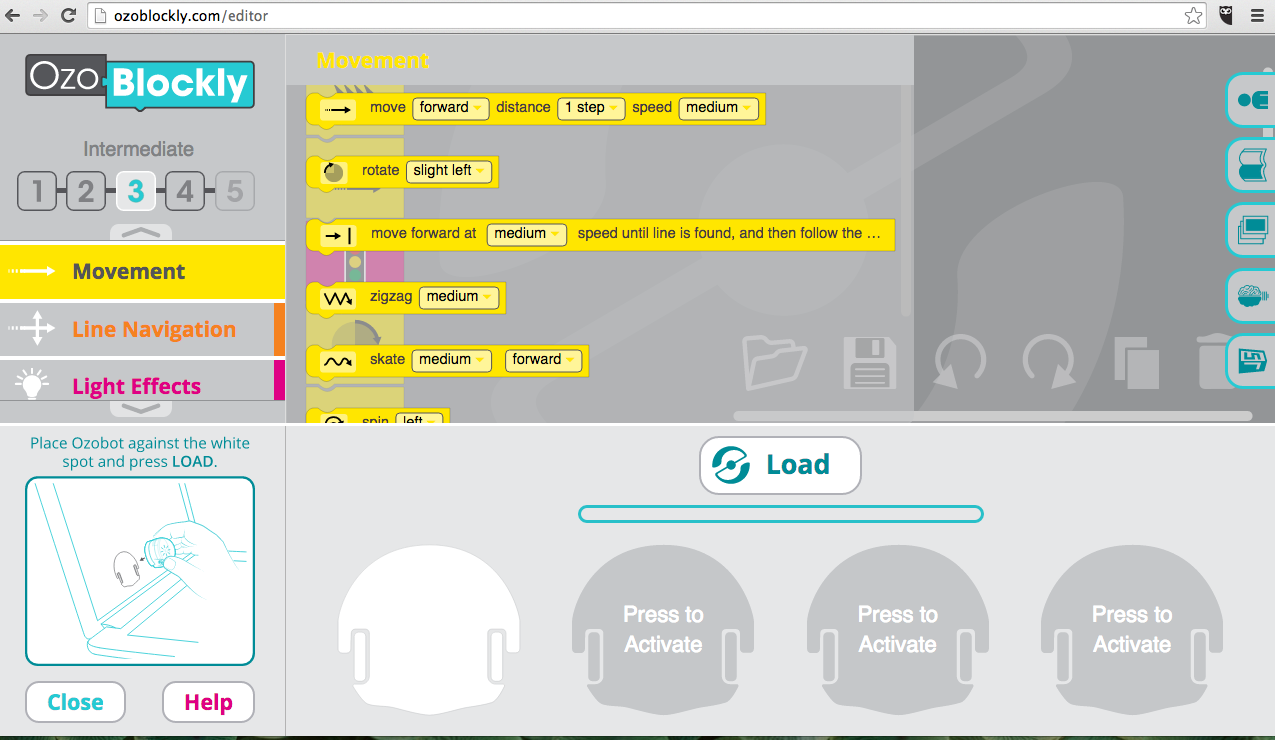
Ozobot is a tiny robot toy which could be easily packed in a ping-pong ball. Five optical sensors placed underneath of the robot enable Ozobot to sense its environment and navigate within it. Ozobot can follow the line drawn on a piece of paper or your smart tablet. It can also detect colours and read specific factory preprogrammed colour sequences. In addition Ozobot can be easily programmed with the OzoBlockly programming language which is similar to Scratch.
Recipes
Drawing Games http://ozobot.com/play/drawing-games
Programming with OzoBlockly http://ozoblockly.com/
Programming with FlashForth http://ashleyf.github.io/ozobot/
Education Lessons http://ozobot.com/stem-education
More info
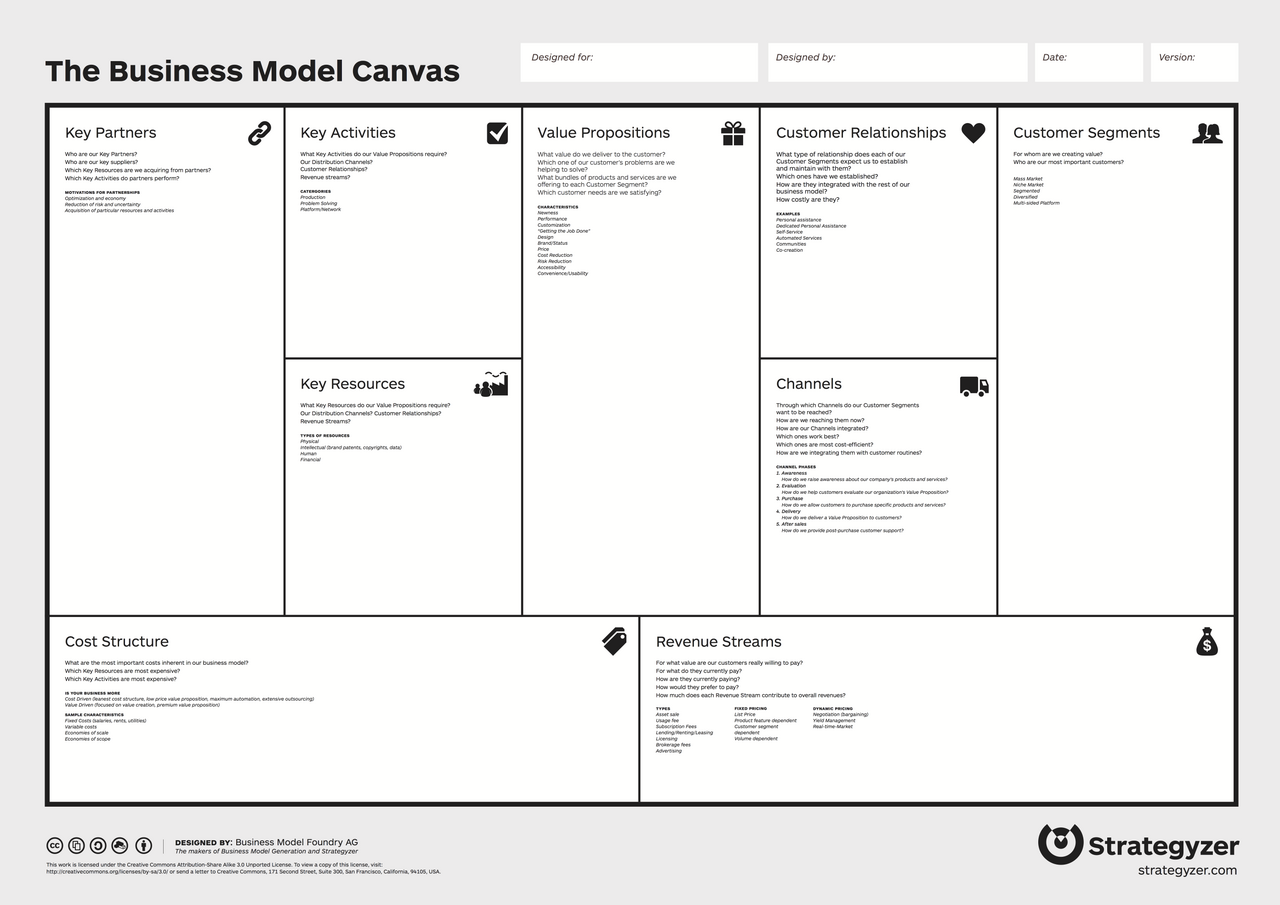
Business Model Canvas
What is it
The Business Model Canvas is a method for developing a business case using a one-page template to outline the intended users, funding model and strategic objectives of the project.
It was initially developed by Alexander Osterwalder and was the inspiration for other canvas template models such as the Lean Canvas.
It’s a great way to collaboratively develop a plan for a new event or makerspace by focusing on the core elements.
The elements included are:
- Infrastructure
- Key Activities
- Key Resources
- Partner Network
- Offering/Value Proposition
- Customers
- Custom segments
- Channels
- Customer Relationships
- Finances
- Revenue Streams
- Cost Structure
Downloads
Business Model Canvas Poster (PDF)
An example business model canvas for a library makerspace (docx)
Online resource
Create interactive environments with MaKey MaKey and Soundplant
Intro
Would you like to create an interactive space in your library, school or indeed any public space? This recipe shows you how to use MaKey MaKey and Soundplant to change your familiar environment into a magical interactive playground.
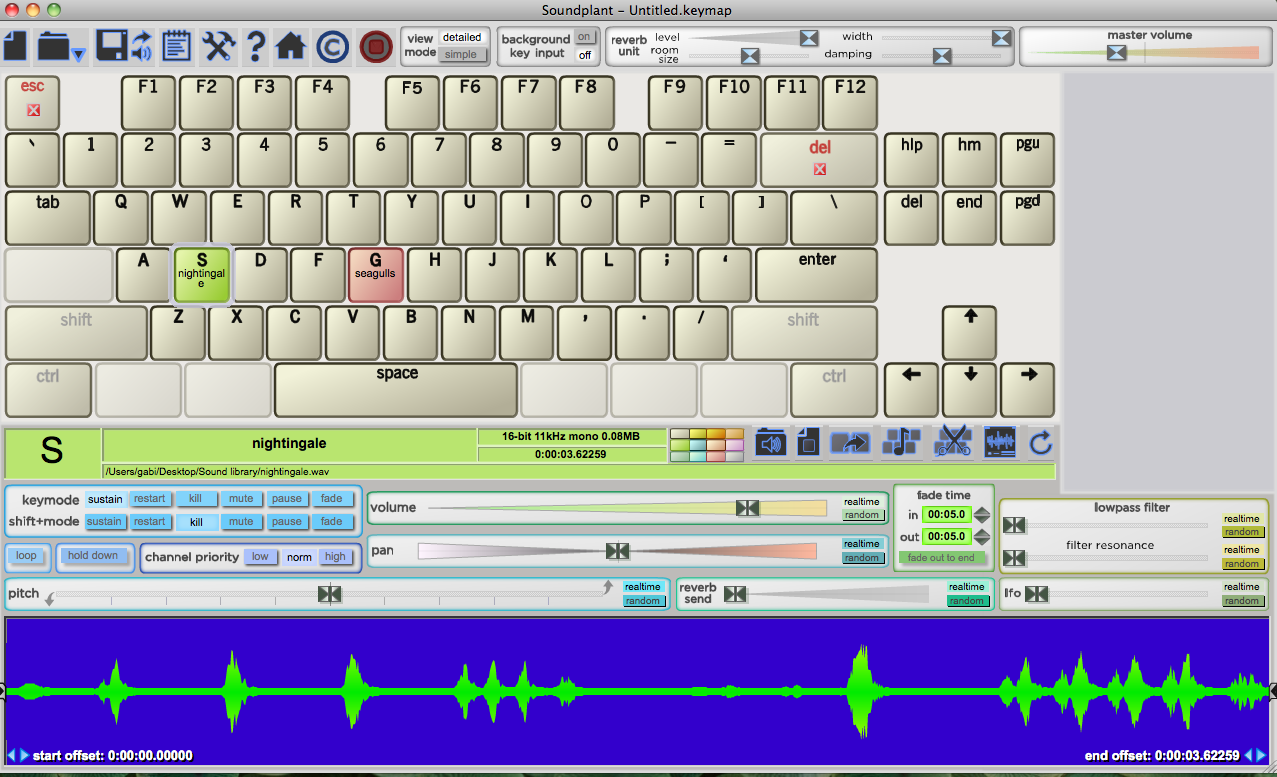
What you need
- MaKey MaKey (including Mini-B USB cable)
- Male to male jumper wires
- Alligator clip
- Soundplant software
- Computer (any Windows or Mac of the past 8 years will do, but for optimal performance a multicore processor and 4GB RAM is recommended)
- Various conductive objects
- 6 Sound files - Sound/music files of any format and size
- Speakers (optional)
How
- Connect MaKey MaKey into your computer using USB cable. Plug the small side of USB cable into MaKey Makey and the big side into your computer. (If your computer asks you to install the drivers, simply click cancel or close the window.)
- Open this link on your browser http://soundplant.org/ to access and download the Soundplant software.
- Open Soundplant. Make sure it is open on your screen all the time.
- Drag and drop your sound files onto the keyboard keys you would like to use on Soundplant. In this case we assign individual sounds onto keys W; A; S; D; F; G.
- Connect to Earth - Now you can connect one end of an alligator clip to the bottom of MaKey MaKey which is marked as “Earth”.
- Connect to Yourself - Then you hold the other end of the alligator clip (the metal part) between your fingers, and now you become “grounded”.
- Connect MaKey MaKey to various conductive objects - If you want your objects to become your keyboard keys, you connect them to your MaKey MaKey with the help of jumper wires. On the back left side of MaKey MaKey you find six letters W; A; S; D; F; G. Connect each of them with male to male jumper wires to your selected conductive objects.
Now you can play your favourite sounds by touching your selected conductive objects with your “grounded’ hand.
More info
https://learn.sparkfun.com/tutorials/makey-makey-quickstart-guide
Soundplant
What is it
Soundplant is the computer keyboard sound triggering software developed by Marcel Blum.
It is a digital audio program which turns your computer keyboard into a sound-triggering device or juke box.
By drag and drop, you can easily assign sound files of any format and size into all keyboard keys with no extra hardware needed.
You can use Soundplant in performance, as an educational aid, as a presentation, as an instrument, as a DJ set and many more.
By using Soundplant you can mix together tracks in realtime, create loops, sketch sound designs, or trigger sound effects.
It runs easily on any Windows or Mac computers, but for optimal performance a multicore processor and 4GB of RAM are recommended.
More info
OzoBlockly
What is it
OzoBlockly is a programming editor which enables you to take the full control of your Ozobot’s movements and behaviours. OzoBlockly enables you to create your own block-based program and load it into Ozobot Bit. It runs in modern web browsers across most major operating systems.
More info
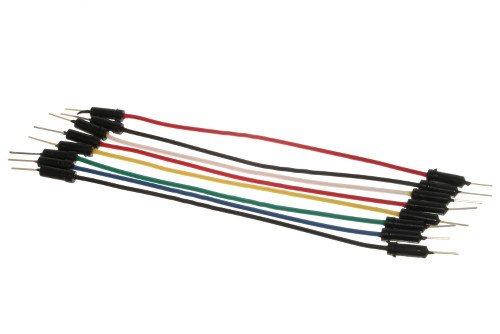
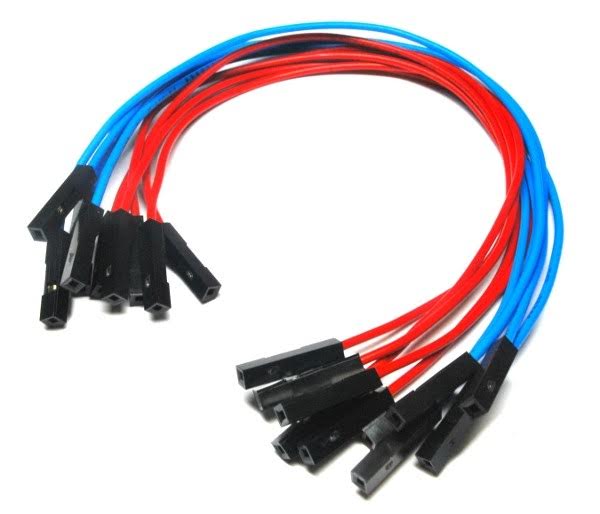
Jumper wires
What is it
A Jumper wire is a short electrical wire mostly used to connect the components on a breadboard. They come in three variations: 1. male-to-male, 2. female-male, 3. female to female.
male-to-male jumper wires
female-to-male jumper wires
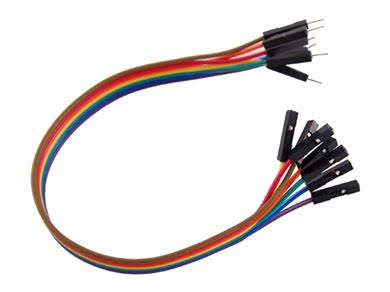
female-to-female jumper wires
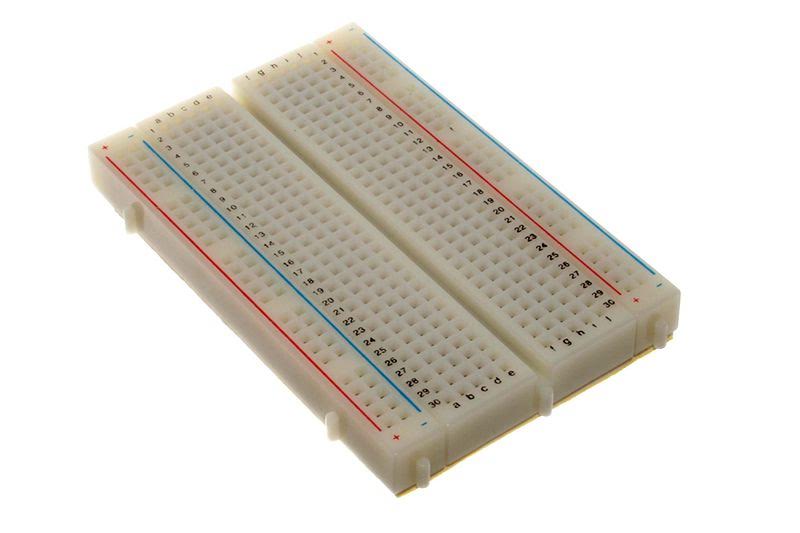
Breadboard
What is it
A Breadboard is a construction base for prototyping used in electronics. It is reusable and does not require any soldering. For these reasons the solderless breadboard is great for prototyping and experimenting with circuit designs.
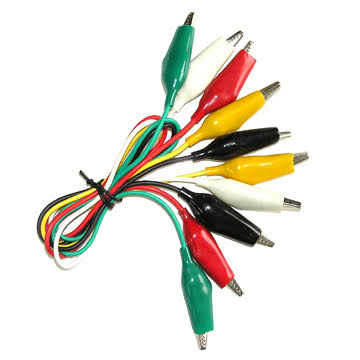
Alligator clips
What is it
An Alligator (or Crocodile) clip is a mechanical device used for creating a temporary electrical connections. They are often used to quickly assemble or modify experimental circuits or to connect components to wires.
Intro to Maker Faire
Intro
Maker Faire is a festival of making, invention and creativity for people of all ages who are interested in making things. Since its initial launch in the Bay Area in 2006 Maker Faire has become widely popular not only among the maker enthusiasts but also the general public. Nowadays, there are many independently produced Maker Faires happening around the world. Click here to find a faire near you.
Maker Faire is an annual event where makers gather to showcase the projects they’ve been working on. A mixture of hobbyists, tinkerers, artists, educators, engineers, scientists, community leaders and people from different walks of life share the knowledge they have learned. At the event people from general public have a chance to participate in hands-on activities and learn new skills such as soldering, 3D printing, robot-building, creating a comic strip etc.
More info
Intro to Make Magazine
Intro
MAKE Magazine celebrates the philosophy of the Maker movement. It is a bimonthly magazine published by Maker Media which features Do-It-Yourself and Do-It-Together projects involving computing, robotics, electronics, 3D printing, woodworking and many other disciplines such as knitting, weaving, printing, bookbinding etc.
Each volume offers articles and columns related to a particular theme, but the main focus is on step-by-step projects ranging from easy to difficult. The Skill Builder sections explores the tools and techniques needed to realise to most challenging projects. It also features a Toolbox section including reviews of books and tools.
More info
Using the command line on Raspberry Pi
Intro
If you haven’t used a command line interface (CLI) before, you might be a bit lost when you first start up your Raspberry Pi and you see a login screen like this:
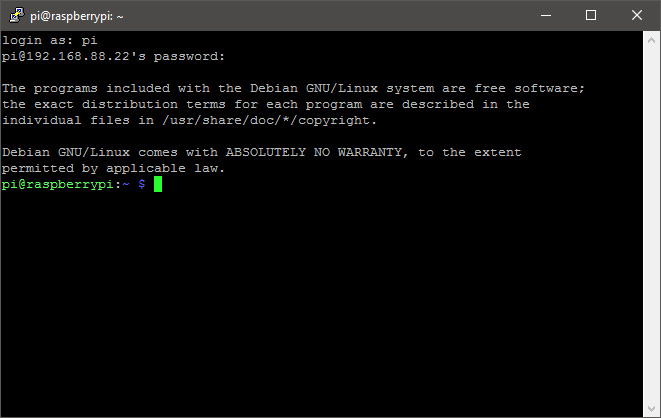
Most the time, when using computers, we are accessing them using a Graphical User Interface (GUI). So, when you start your laptop, you see a Windows or Mac login screen or your Desktop layout.
This command line is a text-based interface for sending commands instead of a graphical one. Before computers could support graphics, users interacted with them via the terminal or command line and this is still available and commonly used in non-graphical environments such as servers.
How
The default username to log in to a raspberry pi is pi and the password is raspberry. Once you’ve logged in, you will see that the command line prompt now starts with pi@raspberrypi.
You can now use the raspberry pi using terminal commands or boot the Pi into its GUI Desktop by typing startx.
Other basic commands
To change directory, used the cd command
cd /home/pi
To change directory to the parent directory
cd ..
To list the directories and files for the current directory
ls
To make a new directory
mkdir myNewDirectory
to change into the new directory would then be:
cd myNewDirectory
To shut down the Rasberry Pi
sudo poweroff
To reboot
sudo reboot
To start the GUI desktop
startx
Apt-get is the command-line tool for managing packages for Debian Linux
To download a package from the package directory
apt-get packagename
To download and install
apt-get install packagename
To uninstall a package
apt-get remove packagename
Nb you can use the up and down arrow keys to navigate through previous commands
More info
Raspberry Pi documentation - terminal
CLI Spells for the Raspberry Pi
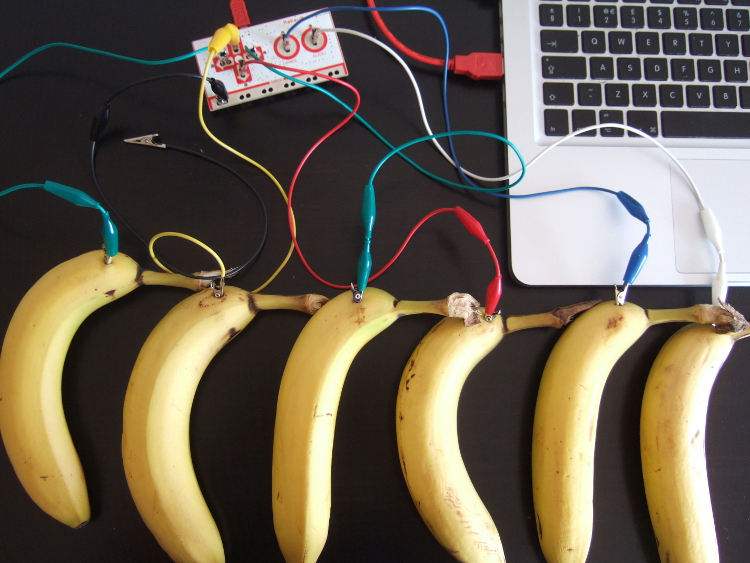
How to make a Banana Piano with MaKey Makey
Intro
A great and fun starter project for using a MaKey MaKey is to use different objects to replace the computer keyboard buttons to play a virtual piano. There’s an online piano keyboard we can use available on the MaKey MaKey website. In this example, we’ll use bananas as our piano keys.
What you need
- MaKey MaKey (including Mini-B USB Cable)
- Six bananas
- Alligator clips
- Computer
How
-
Connect MaKey MaKey to your computer using USB cable. Plug the small side of USB cable into MaKey MaKey and the big side into your computer. (If your computer asks you to install the drivers, simply click cancel or close the window.)
-
Open this link on your browser http://makeymakey.com/piano/ to access a piano keyboard designed specifically for MaKey MaKey. Click on it and play using your computer keyboard’s arrows, space and click.
-
Connect to Earth. Now you can connect one end of an alligator clip to the bottom of MaKey MaKey which is marked as “Earth”.
-
Connect to Yourself. Then you hold the other end of the alligator clip (the metal part) between your fingers, and now you become “grounded”.
-
Connect MaKey MaKey to bananas. If you want bananas become your piano keys you simply connect them to your MaKey MaKey with the help of alligator clips. On the front side of MaKey MaKey you find four arrows, space and click. Connect each of them to a banana. Now you can play a melody with your banana piano.
More info
Intro to littleBits
What is it ?
littleBits are an open source electronic module platform of electronic building blocks that are designed for prototyping and experimenting with electronics. They’re a useful and fun tool for learning about Internet of Things and basic circuitry, though they are a little more expensive to get started with than other electronics kits.
The company was started by Ayah Bdeir and, for the most part, the Little Bits circuit designs are open source.
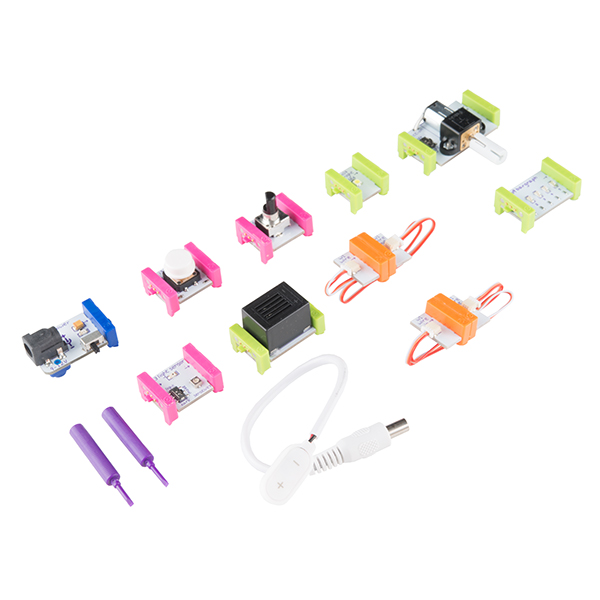
The modules are colour-coded and there are currently over 60 modules in the library that can be connected to form different combinations.
- The Power Bit, Battery & Cable You need a power Bit, a 9V battery, and a littleBits battery cable to start a circuit.
Bits are grouped into four color-coded categories:
-
POWER is blue - every circuit needs a power bit to start with
-
INPUT is pink. These provide information and signals to the Bits
-
OUTPUT is green. These are the ‘doing’ bits. They complete an action or a task (such as a light or movement). These
-
WIRE Bits let you expand the circuit’s reach and change direction and can also be used to add programmability to your circuit.
Order of operation matters - Always start with a Power bit and remember that input Bits only affect the Bits that come after them.
Recipes
There are a series of lessons for littleBits on the official website, including beginner and intermediate tutorials. You can also upload your own.
Check out the ‘Hack my House’ workshop for beginners which includes the 3-d paper structure templates to download and use.
litleBits CloudBit QuickStart Guide (PDF) - by Invent To Learn
Case studies
DIY Clubs in the Library Makerspace - Spotlight on the Duxbury Free Library
More info
The official site at: https://www.littlebits.cc/
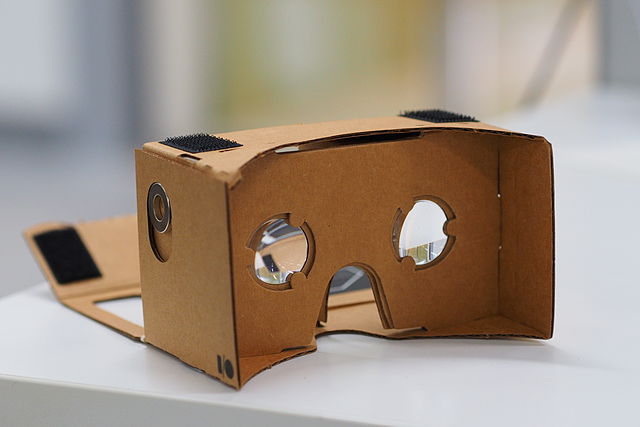
Intro to Google Cardboard
What is it ?
Google Cardboard is a virtual reality (VR) platform developed by Google that consists of a the Cardboard SDK, a platform for developers to create virtual reality experiences and a cardboard, printable mount you can use with a mobile phone to view VR applications (an affordable VR headset you can print and fold yourself or buy from 3rd party suppliers).
It’s an affordable way to play with virtual reality content but it does depend on your smart phone, it’s not standalone.
The latest Cardboard was released in early 2015 and is designed to work with smart phones with screens up to 6 inches. And it has a button (the first version didn’t).
Once you have a viewer, you can download compatible apps from the app store. Scan the QR card on the viewer and then put your phone inside the Cardboard viewer to view the virtual reality content.
There’s an official Google Cardboard app with examples to get you started.
Recipes
Print and build your own Google Cardboard mount
Watch (your library’s) YouTube content on Google Cardboard http://www.technobuffalo.com/2015/11/05/youtube-google-cardboard-vr-video/
Case studies
Some educational apps available in the Play Store include
More info
Google Cardboard help centre
https://support.google.com/cardboard/#topic=6295044
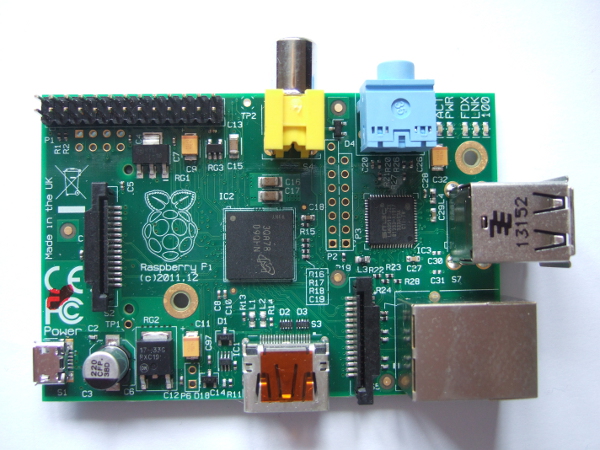
Intro to Raspberry Pi
What is it ?
The Raspberry Pi is a tiny, low-powered computer designed to help people learn programming and for use in electronics projects. It’s about the size of a credit card and needs to be connected to a TV or monitor, keyboard and mouse.
The Raspberry Pi Foundation is a registered educational charity that produce a lot of support materials and resources to help people learn about computing and using the raspberry pi.
When you first connect your raspberry Pi, you may not have an operating system installed. You can install a custom version of the Debian linux operating system made specifically for the Raspberry Pi called Rasbian.
The easiest way to install this is by using NOOBS (New Out Of the Box Software), an operating system install manager created for the Raspberry Pi. You can either buy this on an SD card that you can insert into your Raspberry Pi or you can create the SD card installer yourself.
Recipes
How to install and customize Rasperry Pi zero (Adafruit)
Learning Python - https://www.raspberrypi.org/learning/python-intro/
Case studies
Using a raspberry Pi to install a wireless library
More info
Free Learning Resources - https://www.raspberrypi.org/resources/
Intro to 3D Printing
What is it ?
3D Printing is the process of creating three-dimensional physical objects from a digital file. It’s also sometimes called additive manufacturing as the process is based on adding layer after layer of material until the object is complete.
There are now different processes used by 3D printers for converting a 3D Model into a physical object but the most common methods used are Stereolithography (SLA) and Fused Deposition Modeling (FDM)/Fused Filament Fabrication (FFF) (the names are used interchangeably - it’s just that FDM was trademarked by Stratasys Inc so FFF was developed as alternative terminology). Most consumer 3d Printers use this method.
The process involves feeding a thermoplastic substance into the 3d Printer where it is melted and turned into a 3D object based on the design instructions fed into the printer.
Recipes
Beginner 3D Printing Projects (Instructables)
Print a Desktop organiser (Thingiverse)
Case studies
Brighton Jubilee Library visitors get ‘Mini-Mes’ (BBC)
Loveland Public Library: Empowering Patrons Through 3D Printing (Lulzbot)
3d Printing Concepts - (written by a librarian and comes with STL files)
More info
3D Printers - How Do They Work? (PDF) - An in-depth explanation of common 3D printing terms and processes using the Ultimaker 3D printer as an example
Thingiverse - http://www.thingiverse.com
Installing NOOBS on a Raspberry Pi
Intro
Raspberry Pis are effectively fully functional mini-computers but they come without an operating system so there’s not much you can do without first installing one.
Luckily there’s been various tools created to make this easier. NOOBS stands for New Out Of the Box Software and it’s an install manager for the Raspberry Pi.
To install NOOBS on the Raspberry Pi, you have to install it on a bootable SD card. It’s recommended to have an SD card with at least 4gb space on it but different uses require different sizes so go for something at least 8gb if you can.
What you need
- An SD card (at least 4gb) formatted as FAT32
- NOOBS files downloaded
How
Format an SD card (at least 4GB) as FAT.
The way you format an SD card is different on Macs, Windows or Linux computers. For Macs, you can open the Disk Utility app (Applications/Utilities), select the SD card from the list of available drives and select the erase option. Here, you can choose how to reformat the disk. Set it to MS-DOS (FAT) (see below).
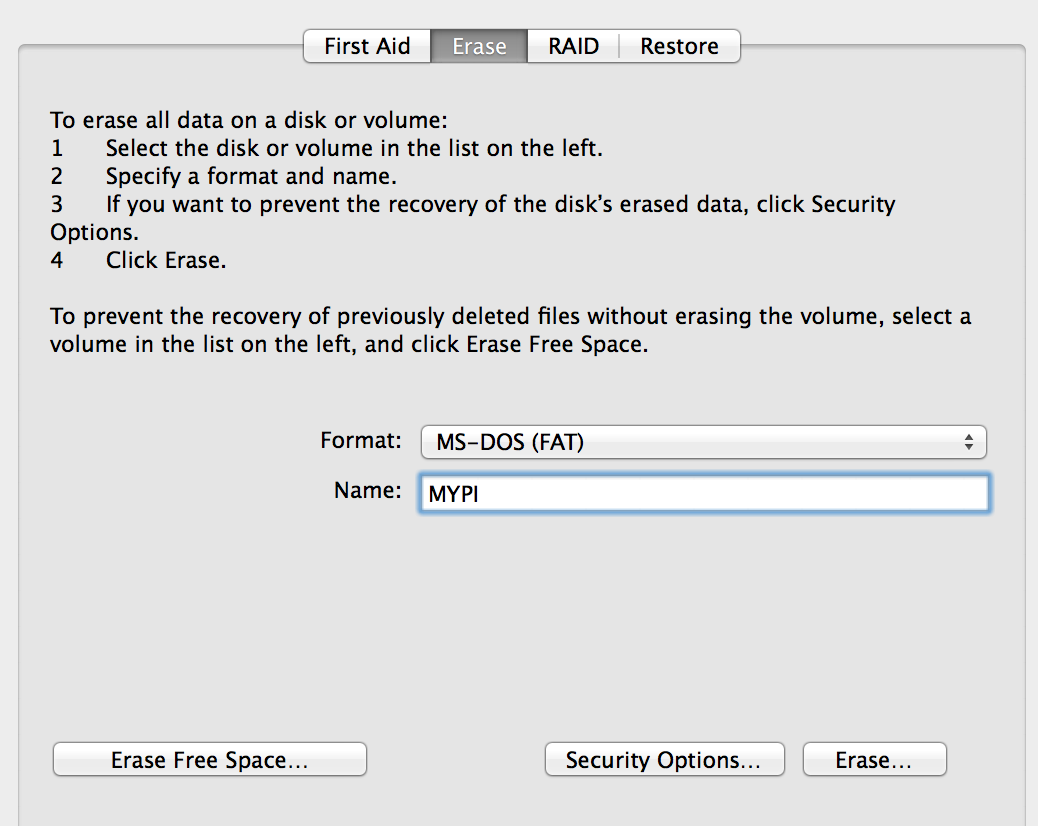
For Windows, you need to download a formatting tool like using the SD Association’s Formatting Tool, available from sdcard.org. Linux users, you know what to do ;-)
Save the files to the SD card
- Download the NOOBS files from https://www.raspberrypi.org/downloads
- Unzip the files
- Move the files onto the SD card. They need to be in the root directory, so make sure they’re not in a subfolder. So, if the version you’ve download is v1_9_2, move all of the contents of the unzipped NOOBS_v1_9_2 folder onto the SD card.
Boot the Pi
- You can now insert the SD card in the raspberry pi and connect it to a monitor and power. The installer will launch and walk you through the next steps.
More info
http://www.raspberrypi.org/help/noobs-setup/
Uploading your first sketch on Arduino
Intro
To interact with an Arduino board (such as the Uno), you need to use the Arduino Integrated Development Environment (IDE). This can be downloaded from: https://www.arduino.cc/en/Main/Software
The Arduino hardware runs programs called ‘sketches’ (written in the C++ language) that are uploaded to it. Using the IDE, you can run example sketches, modify existing sketches or create your own.
In this tutorial, we’re using an Arduino Uno so you’ll need to update the references to that to match the Arduino model you’re using.
What you need
- An Arduino Board
- Arduino IDE software
How
-
Connect the Uno to your computer with a USB cable. Once it’s correctly connected, the green LED (labelled PWR) should light up.
-
You need to tell the IDE what Arduino board you are using*. From the Tools menu, go to Board and then select the option that matches your Arduino board.
-
You also need to set the serial port - the serial device of the Arduino board you are using. Again, from the Tools menu, now go to Serial Port and choose /dev/tty.usbmodem (this may vary, for older boards you may need to use /dev/tty.usbserial).
If you’re not sure which Serial Port option to choose, disconnect the Arduino from your computer. It’s Serial Port will then disappear from the options. Reconnect and select the relevant serial device from the list.
The IDE should now be able to communicate with your Arduino board.
-
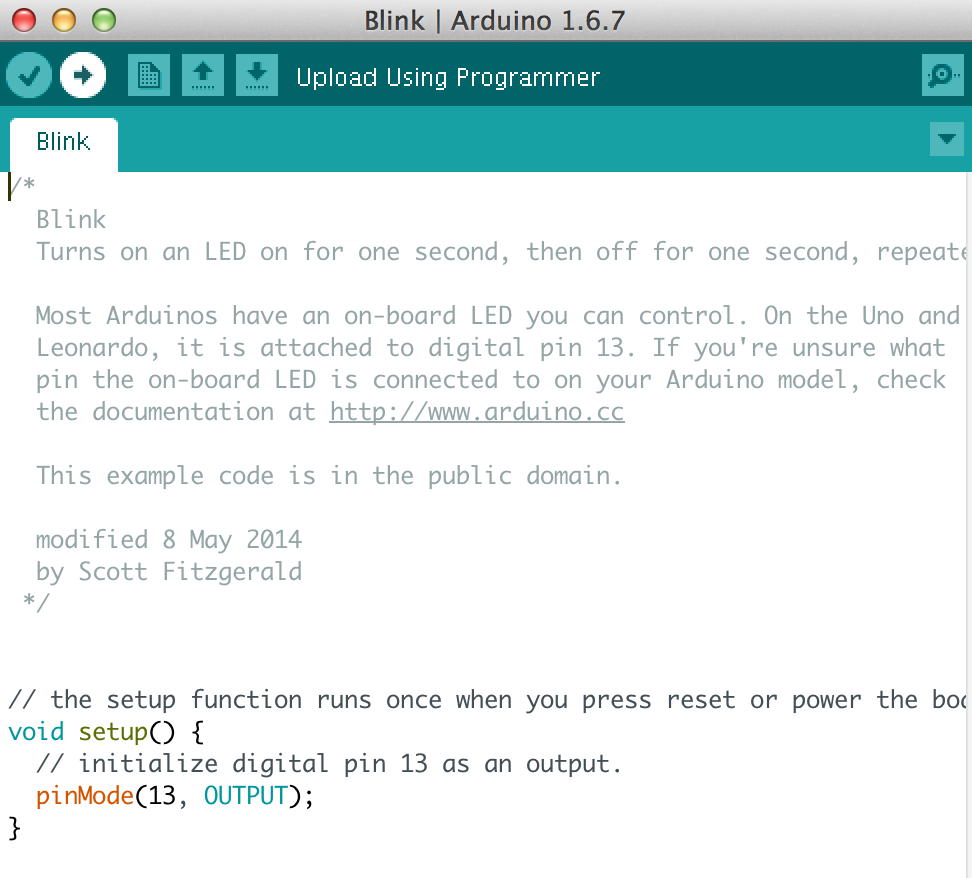
To upload the sketch, choose one of the options from the examples menu (e.g. File > Examples >01.Basics > Blink)
-
Click the “Upload” button in the environment.

- The lights on the board will blink while the sketch is being uploaded. If the upload was successful, you will see the orange pin 13 (L) LED start to blink (in orange). and the message “Done uploading” will appear in the status bar.
Congratulations, you have successfully run a program on your Arduino board.
More info
About the Arduino IDE https://www.arduino.cc/en/Guide/Environment
Other projects to try https://www.arduino.cc/en/Main/ArduinoStarterKit
Intro to Scratch
What is it ?
Scratch is a programming language that allows you to create your interactive stories, games and animations by using blocks as scripts. By dragging, dropping and connecting blocks into the Script area you can easily create a program of your choice. Each object in Scratch is called a sprite. You can add a new sprite and customise it according to your needs. To make it more exciting you can add a sound, change colours, add a backdrop and effects, and other fun stuff. Scratch is designed especially for ages 8 to 16, but widely used by people of all ages. Using Scratch is an easy and fun start into the world of programming.
Recipes
Use Scratch with the MaKey Makey to create interactive stories and games. https://scratch.mit.edu/about/
Case studies
How to Host a Scratch Educator Meetup http://scratched.gse.harvard.edu/stories/how-host-scratch-educator-meetup
Sound Design and Programming https://techiemusings.wordpress.com/2015/12/27/sound-design-programming-makeymakey-scratch-project-coding-thejoylabz/
More info
Official Scratch website
ScratchEd- an online community where educators share their stories ideas and resources http://scratched.gse.harvard.edu/
Intro to MaKey MaKey
What is it ?
MaKey Makey is a great introduction tool into the world of electronics and basic coding. It’s very simple to use, thus suitable for absolute beginners of all ages with no prior technical knowledge required.
It works on the same principle like a basic circuitry. Using this simple invention kit allows you to turn every-day (conductive) objects into a keyboard, hence Makey Makey, and connect them with the internet. For example, you can create a magical vegetable piano simply by connecting MaKey MaKey with your favourite vegetables and your computer.
A great thing about MaKey MaKey is its compatibility with Arduino. Using Arduino you can easily reprogramme the MaKey Makey and customise the key-mapping to suit your project’s needs.
For more advanced users we highly recommend to install the Arduino Addon, which makes the MaKey MaKey even more fun to play with.
Recipes
Please follow this tutorial if you want to install the Arduino Addon. https://learn.sparkfun.com/tutorials/makey-makey-advanced-guide#installing-the-arduino-addon
Use Scratch with the MaKey Makey to create interactive stories and games. https://scratch.mit.edu/about/
Create your own interactive classroom or library http://makeymakey.com/lessons/interactive-room-challenge/
Case studies
Learning with MaKey MaKey: Transforming Objects/Transforming Learning http://www.lib.ncsu.edu/stories/learning-makey-makey-transforming-objects-transforming-learning
Creating Computer Games with MaKey MaKey and Scratch http://showmelibrarian.blogspot.co.uk/2014/06/creating-computer-games-with-makey.html
Interactive posters using the MaKey MaKey. These posters were created to trigger the instrument sounds when touching different parts of the poster. https://www.youtube.com/watch?v=uQJ-WRbxigk
Interactive books https://www.youtube.com/watch?v=uHMEY_6Dgcc
Interactive zine http://makeymakey.com/guides/zine.php
More info
MaKey MaKey official website is a great source of knowledge providing a plenty of tips for group activities, lesson plans and guides how to use MaKey MaKey in practice. http://www.makeymakey.com/
Intro to Arduino
What is it ?
Arduino is an open-source electronics prototyping platform. It is intended for anyone who wants to learn programming code as well as built cool interactive hardware objects or devices. Its easy-to-use microcontroller boards and development environment allows you to communicate with the objects which surround you.
Since its introduction to the market in 2005, it has been very popular not only amongst the electronics geeks, but also artists, hobbyists and makers, both amateurs and professionals. It has been the base for thousands of creative projects created in the Makers community.
Arduino is cross-platform, which means that it can be run on Windows, Mac and Linux operating systems.
Both Arduino software and hardware are open-source, so you can share your ideas with other members of the Arduino community worldwide.
Recipes
For getting started with Arduino and how to install the Arduino environment on your computer please visit the Arduino official site. https://www.arduino.cc/en/Guide/HomePage
Case studies
Students build smart devices and scientific instruments with Arduino https://opensource.com/life/14/9/tools-scientific-discovery-open-hardware
More info
The official site at: https://www.arduino.cc/
How do I submit a recipe?
To submit a recipe, either send it to us or create a new follow the instructions on Github to create a new pull request.
Subscribe
Subscribe to this blog via RSS.
Categories
Question 1
Ingredients 21
Recipes 26
Recent Posts
-
 Posted on 24 Jul 2017
-
 Posted on 20 Jun 2017
-
 Posted on 15 Jun 2017
-
Getting started with JavaScript Blocks Editor (PXT) on Micro:Bit
Posted on 10 May 2017
Popular Tags
Arduino (2) Microcontrollers (2) Makeymakey (6) Scratch (8) Coding (6) Software (3) Sketches (1) Ide (1) Raspberrypi (11) Linux (2) 3dprinting (1) Manufacturing (1) Vr (1) Virtual_reality (1) Google (1) Circuits (3) Littlebits (4) Kits (2) Keyboard (2) Inputs (1) Cli (1) Command-line (1) Magazine (1) Make (2) Events (4) Makerfaire (1) Wires (2) Equipment (2) Breadboard (1) Electronics (3) Audio (1) Soundplant (2) Planning (2) Funding (1) Ozobot (1) Creative-computing (1) Music (3) Sonicpi (3) Cloudbit (2) Thimble (1) Images (1) Html (2) Webmakers (2) Internet (1) Ifttt (1) Sensors (2) Css (1) Learntocode (4) Paint (1) Conductivity (2) Picoboard (2) Activities (1) Workshops (3) Families (1) Microbit (4) Javascript (2) Paper (1) Electricity (1) Display (1) Browser (1) Remote (1) Headless (1) Signage (2) Digital signage (2) Privacy (1) Security (1) Configuration (1) Tools (1) Troubleshooting (1) Bugs (1) Problem-based learning (1) Hex (1) Programs (1) Onboarding (1)